Home ▸ Articles ▸ Workouts ▸ Training with ropes for CrossFit
Battle Ropes training has been a pretty hot topic in the fitness world for the past few years. This unique exercise tool has attracted many fans, and today such ropes can be seen everywhere from Adidas advertisements to UFC videos. They are considered to be best used in CrossFit.
In this article, you will learn both the basic principles and the latest CrossFit rope training techniques that have been used for the past few years.
Benefits of rope training
- Later formation of lactic acid in the upper body, which comes from long-term intense training with ropes. Accordingly, the intensity can be maintained for up to 5 minutes, and this is unique.
- Ropes fans are funny . Many people hate the gym, and not because they are lazy. It's just boring in a big typical gym and not much has changed in the last 30 years. And the ropes in training are like a breath of fresh air, invigorating and making you return to this “game” again and again.
- Developing mental endurance . When people start rope training, maintaining intensity for 1 minute seems like a pipe dream, but consistent training helps them overcome mental barriers, reach that goal, and gain new perspective and confidence.
- Finding balance. If you carefully observe the movements during rope exercises, you may notice that one side of your body may move differently than the other. This gives rise to a feeling of uncoordination. However, with continued training, these differences disappear. Gradually you will notice that your right and left sides begin to balance.
Rope exercises
In the arsenal of CrossFit fans there are a lot of exercises performed with this equipment. With such a projectile you can effectively work not only your hands, but also other parts of the body. In all the exercises described below, except the last two, the ends of the rope are taken in the hands.
Waves in a half squat
- Take a half-squat position.
- Alternately move your arms up and down, extending them at the elbow joint to create waves.
This CrossFit variation builds arm strength while also strengthening your core, back, and leg muscles.
Double wave
- Starting position as in the previous exercise.
- Using both hands at once, move up and down, creating waves on the rope.
The entire core works here, which develops the overall strength of the body.
Jumping with clapping
- Half squat position.
- The rope lies freely on the floor.
- Take a powerful jump.
- At the same time, raise your arms above your head to the maximum possible height.
- When landing, make an active movement with your arms, hitting the floor with the rope.
This develops explosive strength, which is necessary for barbell bench press or deadlift.
Waves in a half squat
Rotation with a projectile
- Hold your hands with the ends of the rope near your right thigh.
- Using your core, turn so that they are at your left hip, while at the same time turning your right leg and knee joint inward.
- As soon as the rope drops to the floor, immediately repeat for the other side.
The movement should be carried out exclusively by the effort of the body and legs - hands are needed only to hold the projectile. Suitable for developing core and leg muscles.
Rope throw from a standing position
- Stand up straight.
- Generating force from the bottom up, from your feet to your arms, raise your arms as high above your head as possible.
- Then, make a sharp and strong movement, throwing the rope to the floor.
During execution, all the muscles of the arms, as well as the back and legs, actively work.
Alternating wave jumps
- Stand straight, bring one leg slightly forward and bend at the knee.
- Straighten the other leg and take it back, resting it on the floor.
- Perform jumps with alternating legs. You should land with your leg bent in a lunge.
- At the same time, slam the rope on the floor.
Thanks to the combination of various loads, such crossfit develops the shoulder girdle well, and also actively involves the legs in the work.
Double wave + plank
- Stand straight with your feet shoulder-width apart.
- As you inhale, lift the rope above your head and immediately hit the floor with it.
- After this, immediately take a sitting position.
- As you exhale, take a plank position from a sitting position, throwing your legs back.
- Jump your legs back up, stand up and repeat from the beginning.
These varied CrossFit movements put intense stress on the entire body.
Running forward backwards
- Stand up straight.
- Run, preferably on your toes, first forward, then backward, at a distance of up to three meters.
- At the same time, create waves on the rope with your hands, while changing their amplitude.
In this way, you can develop your body's agility and endurance.
Double wave
Plank with wave
- Assume a plank position with one arm straight.
- The second hand should hold the end of the projectile.
- Spread your legs wider to achieve good support on the floor.
- Keep your spine straight.
- With your hand with the rope, begin to move sideways - left to right.
The point is that you simultaneously develop the abdominal and core muscles, maintaining the correct body position, and the shoulder area of the second arm, which moves with the rope.
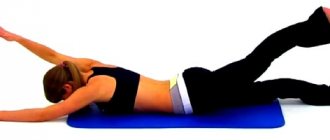
Side plank with rope
- Attach one end of the rope to a weight.
- Get into a side plank position.
- Use your top hand to hold the other end.
- Pull the rope towards you until the weight is near you.
- Repeat for the other hand.
By performing a side plank with this complication, you give the obliques and transverse muscles an incredible load that cannot be achieved in the usual way.
Functional crossfit training with a rope can be used as an independent type of training.
A variety of exercises will allow you to intensively develop all muscles at once. In this case, you will have a minimal risk of injury during the workout. Video of basic rope exercises
How to use ropes for exercise
- Relax. Learning to relax under stress is vital. Many people grip the ropes tightly and strain their bodies, which leads to fatigue quickly. Grip the rope lightly, relax your arms, shoulders, torso, and even your face—you'll be able to move faster and maintain intensity for longer periods of time.
- Breathe. It has a lot to do with learning to relax. CrossFit rope exercises do not have a resting point that allows you to relax and breathe in a coordinated manner like other workouts. Beginners tend to hold their breath when working with ropes and damage it. Try to combine your movement with your breathing, as your speed and intensity increase, your breathing should also increase.
- Full body workout. While most CrossFit rope exercises are considered upper body exercises, you should always use your entire body to increase power and efficiency. The legs and hips play an important role in generating energy to and through the arms. This is important for any sport, especially athletics. As you make waves, be aware of your feet, legs, hips and shoulders. Make sure you are not standing too rigidly and that all areas of your body are active.
How to do?
Despite its apparent simplicity, many rope exercises in the gym require special technique. The general principles for all exercises are the same:
- Do not use safety straps. The load should be limited to maximum wrist strength.
- Work at a moderate speed, increasing the load gradually as muscle mass increases.
- Combine with statodynamic exercises.
- Use basic pre-fatigue exercises before working with a rope.
- Work in pairs with a partner who will control the correct technique of performing the exercises.
- Use a heart rate monitor throughout your rope set. If your heart rate exceeds the permissible rate, stop and take a break.
Note: the maximum allowable heart rate is calculated using a simple formula (220-age) * 80%. Upon reaching this pulse, you need to immediately reduce the intensity of the exercise, since the athlete runs the risk of getting microtraumas to the heart, which will be overgrown with connective tissue, and thereby lead to sports heart disease.
Alternating waves in a half-squat
- Take two ropes of extremely large thickness (so that it is impossible to close your fingers around the diameter).
- Get into a half squat.
- Bend your lower back.
- Stretch your arms in front of you, not fully extending them at the elbow joint.
- Slowly start moving your right hand up and your left hand down.
- Gradually speed up your movements.
- At the end of the rope, make a sharp jerk to compensate for inertia.
Work until there is a strong pump or until the pulse reaches a critical level.
Double wave
This is a complicated version of the previous exercise, which requires more concentration, loads not only the upper shoulder girdle, but also the abdominal muscles, due to the need to dampen the inertia of the rope.
- Take two ropes of extremely large thickness (so that it is impossible to close your fingers around the diameter).
- Get into a half squat.
- Bend your lower back.
- Stretch your arms in front of you, not fully extending them at the elbow joint.
- Slowly start moving your hands down and then up.
- Gradually speed up your movements.
- At the end of the rope, make a sharp jerk to compensate for inertia.
Jumping with powerful claps
This exercise is somewhat more complicated, but it uses the leg muscles to their full potential, which can even replace a squat with a barbell.
- Take the ropes in your hands.
- Get into a half squat.
- Bend your lower back.
- Stretch your arms in front of you, not fully extending them at the elbow joint.
- After this, jump sharply up.
- At the same time, raise the ropes as high as possible above your head.
- At the moment of peak inertia, which coincides with the landing, make a “whip” movement, sharply lowering the ropes down.
If the ropes do not fly out of your hands, you can repeat. Work until the pulse is felt, or until the wrist muscles are severely weakened.
Rotation from side to side
- Take two ropes in your hands.
- Make a slight bend in the lower back, while keeping your back generally relaxed.
- Relaxing your lower back, begin to pull the ropes towards your belt (with an intense movement), while simultaneously turning your body in the direction of movement.
- At the peak of the load, turn in the other direction to achieve optimal results.
Repeat until completely exhausted.
Standing rope throw
The technique of a standing rope throw resembles a double wave. The main difference lies solely in the working amplitude. Instead of working in a half-squat, you need to work with a jump, while throwing the rope forward as much as possible (by moving your arms up). Otherwise, everything is identical.
Jumping with alternating waves
Variable wave jumps are performed as follows:
- Two ropes are taken;
- The starting position is taken from a full squat;
- Gradually, the movement begins with one hand down, the other up;
- Subsequently, a deep squat jump is performed;
- In this case, the wave movements do not stop, but only accelerate.
The ideal option is when there are no more than two cycles of wave movements of the arms per jump. The abdominal muscles, muscles of the upper shoulder girdle, back, pectoral and deltoids are worked out.
Exercise "Waves"
Waves are usually what you see on YouTube in commercials. The most challenging aspect of the wave series is the zero downtime when doing the exercises correctly. Waves require 100% commitment.
There are different variations of these exercises, including different intervals for specific times and/or distances. Time, distance, number of repetitions - you can constantly change different indicators for different workouts and goals.
When trying to do a wave series for the first time, 20 seconds will seem like an eternity, but with regular training, people adapt quickly and can maintain a constant pace and intensity from 5 minutes to over 45 minutes. As a recommendation: build up to 10-20 minutes, and then work up the intensity and speed.
A series of waves is performed in a plank position, standing, kneeling, sitting. As you move from standing to kneeling, it becomes increasingly difficult to complete the waves. Adding different movements (squats, lunges, jumps, lateral movements and more) can make a basic movement very difficult.
The faster you progress, the harder and more intense the workout becomes. Try to maintain a pace of 120-150 alternating waves per minute and listen to how you feel.
Upper body and core exercise
These are the same exercises with a rope for classic crossfit, the emphasis in which is not on the hands at all, but on working with a partner and correct body movements.
Throws while sitting
The exercise is similar to working with turns. The main difference is the isolation of the abdominal and core muscles, which is achieved by turning off the muscles of the legs and lower back, which eat up the lion's share of the load.
- Sit on the floor;
- Take 2 ropes in your hands;
- Make wave movements, while trying to pull the ropes to the belt;
- At the moment of attraction, gradually turn the body;
- At the peak of the load from the rope, turn in the other direction.
Plank with wave
The wave plank is a rather pointless exercise in terms of difficulty/effectiveness, but many lovers of handstands in the prone position love it because it allows you to develop the core muscles, much more effectively than a vacuum.
How to do it correctly:
- Get into the plank position on one arm (the hand should rest not on the floor, but on a special stand);
- The second hand should hold the rope;
- Slowly begin to make a wave movement from side to side, gradually accelerating.
Work until the heart rate monitor reaches a critical point.
Side plank with rope
This is a very simple exercise for those who have mastered the side plank.
- Get into a side plank position with the main weight resting on your elbow;
- Maintain deflection;
- In the other hand, take the rope by the tip;
- And slowly - by turning your body back and moving your shoulder blades, move the rope towards you.
It is important to do this not with your arms (biceps muscles), but with your back and body.
- When you reach the end of the rope, turn to the other hand and continue the exercise.
The main feature is cyclicality, and high involvement of the rhomboid muscles of the back and oblique abdominal muscles. The movement occurs solely due to traction with the elbow (not the wrist), which allows you to completely disable the shoulders.
Exercise “Rope Pulling”
These are incredible exercises, but they are not very popular, although they are simple and effective. They challenge the entire body and help build fundamental strength. They are also very effective for those who want to develop more upper body strength.
Like waves, stretching can be done while standing or kneeling, manipulating variables such as time or distance. Want to stretch a mile? Pull out 53 lengths of a 30-meter rope, that's a mile or 1.6 km. You can simply pull at a distance, for example, while sitting.
How to climb a rope correctly?
There are two ways to climb a rope - with the help of legs and without their help. The first option makes the exercise easier and is more suitable for beginners, while the second (without the help of legs) is intended for advanced athletes.
Climbing a rope using your legs
The basic and simplest variation of the exercise is based on three movements. Starting position: standing on the floor, hold the rope with your hands above your head. Don't try to raise your arms too high or straighten your elbows completely. The smaller the angle at the elbow, the easier it will be to pull yourself up.
- Grab the rope with your feet in a “lock”. To do this, bend your knees and pull them up to waist level. Then cross your feet and place the rope between them. It should be secured at the ankles.
- Straighten your knees and climb up the rope. In this case, your arms bend at the elbows, move along the rope and remain at neck level. Hold the rope with your hands close to your body.
- Take turns straightening your arms and again grab the rope above your head, as in the starting position. During the interception, keep yourself firmly on the rope with your feet.
From the outside, this rope climbing technique resembles the movement of a caterpillar. Once you feel confident in climbing the rope, you can move on to the next faster technique of climbing using your legs.
Starting position - standing on the floor, hold the rope at neck level with one hand, and fix it with the other hand just above your head. Repeat the movement with your feet catching the rope in a “lock” as described above. Then straighten your legs and, rising up, grab the rope with the hand that was at neck level.
In this case, the hand, which in the initial position was above the head, moves along the rope to the level of the neck. With each interception and lift up, the hands change places. Interception and lifting are done almost simultaneously, so this method of rope climbing is faster.
How to climb a rope without using your legs?
Rope climbing without legs is the most advanced method and requires basic physical training. Here the entire load falls on the muscles of the arms, back and even the abs. Before climbing a rope without legs, you need to be able to pull yourself up on the bar at least 10 times.
Starting position: standing on the floor, hold the rope with your hands at head level. One hand should be positioned approximately 30 cm higher than the other.
Climb up the rope, taking turns moving your hands and pulling yourself up. Keep your body level. You can bend your knees slightly to maintain balance. To further target your abdominal muscles, keep your legs at a 90-degree angle to your torso.
Exercise “In pairs”
Some people prefer to work alone, but people's performance generally improves when they have good training partners. CrossFit ropes allow you to do a lot of fun exercises for groups of people.
Partner exercises challenge you not only to overcome the friction or weight of the rope, but also the energy created by your partner. Simply holding a rope becomes much more challenging and a completely new sensation compared to solo exercises, plus it's more challenging and fun.
Once you have mastered the basics, you can move on to more advanced levels of exercise. Try it and don't be afraid of anything!
How to rappel down correctly?
The most common mistake in rope climbing (especially in the case of beginners) is an incorrect and excessively fast descent. Many beginners literally slide their hands along the rope, which leads to calluses and burns. This is why quickly sliding along a rope is dangerous.
To avoid mistakes, when descending, grab the rope with your hands one by one. This will save your palms and add additional negative stress to your forearms, biceps and back muscles. This will make rope climbing an even more effective exercise.
***
New Fitseven materials, 5 times a week - in telegram:
- fit7seven
Rope climbing is a beneficial multi-joint exercise. If you're lucky enough to have access to a rope, add 3-5 rope climbs at the end of your workout. It will only take a couple of minutes, but you will be provided with a strong grip.
Working with the team
Tug of war is exclusively a team game. Therefore, the correct placement of participants is required to win. This is the secret of success. Now let's look at the technique of how to defeat any opponent with the help of proper teamwork.
Gather 8 people of varying sizes and strength levels
The great thing about tug of war is that you can learn to win as a group, even if you have the advantage in strength! For organized competitions, 1-2 extra people can be taken as an alternative if someone falls or misses a match.
The first team member is the strongest
This person will act as the group leader. As a rule, this is a well-coordinated participant of average height who has participated in tug-of-war before. This person must be able to maintain a good grip on the rope and have great lower body strength.
Find a group leader and place him in the middle to encourage collaboration
This is definitely a person who can inspire people to act together and believe in victory. He may be a less experienced and less powerful participant in the game. This person's job is to set the pace of the pull, while less experienced teammates can build up endurance and strength in waves. Yes account can be used. For example, the leader might count to three to get you all to pull as hard as you can.
Place someone with good stamina behind
So what do we have?
There are strong ones in front, the group leader in the center. The team will be invincible if a person with good leg and torso endurance is placed at the end of the group. In this way, he can, like an anchor, consolidate the achieved level step by step until victory.
Sometimes the anchor wraps the rope around the back, which is not prohibited by the rules, but can lead to accidents during the game.
A person as an anchor will still be effective if he has a good body weight. In this case, he will be a good fixer of the result, while the task of the strong participants is to take steps back.
Step by step
In this way, the leader inspires the team in jerks, taking a step back every 3-4 seconds. For added stability, chalk can be used as an additional way to improve your grip on the rope. You can buy chalk at a sporting goods and equipment store.