The gluteal bridge with a barbell is an exercise for working the hamstrings and the entire array of gluteal muscles. The movement was introduced into use by American trainer Brett Contreras, who was nicknamed the “glute guru” on social networks. Meanwhile, in strength training, this exercise was known long before Brett, and was performed not only by bodybuilders, but also by weightlifters and powerlifters. The exercise is called the hip extension, oddly enough, and is classified as the only completely pelvic-dominant movement in the Westside system. So the gluteal bridge is classified as a fitness exercise, and even more so, it was not invented for fitness bikini training, as some authors believe today. But this does not prevent the bridge from remaining the best exercise both for developing the strength of the “posterior chain” and for pumping the buttocks.
What is this?
The glute bridge (pelvic lift) is an exercise designed to train the front and back of the thigh and gluteal muscles. This exercise also helps to stretch the leg muscles and even prevent or at least alleviate lower back pain during menstruation, because improves blood flow in the pelvic area.
Is it possible to exercise during menstruation?
Benefit
- the ability to load the buttocks without putting stress on the lower back (unlike squats),
- the gluteal bridge has a simple technique, so usually even beginners do not have any difficulties,
- the abdominal muscles are additionally strengthened,
- and also stretches the back of the thigh,
- variability: you can perform the exercise with your own or free weight even at home, as well as in the simulator,
- improved tone (due to blood circulation) of the pelvic organs and increased libido.
Technique for women
The gluteal bridge (bridge, pelvic lift while lying on your back) is an exercise in which it is very difficult to do something wrong, because it is performed naturally and anatomically comfortably.
In a step-by-step version, pelvic lifts are:
- We strongly advise you to perform the exercise on a yoga mat, foam pad, or at least a blanket!
- Starting position : lie on your back, bend your knees, place your heels firmly on the floor. Hands lie along the body or on the stomach.
- As you inhale, tense your buttocks and lift your hips until your body is in a straight line from your shoulders to your knees. At the climax of the movement, hold for 1-2 counts, tighten your buttocks even more and, as you exhale, lower yourself to the starting position. Repeat the specified number of times.
Pay attention to the position of the spine ; you should not bend in the thoracic and lumbar regions. You must also learn to fully raise the pelvis in peak contraction - until a straight line is formed with the torso. If you can't do this, i.e. There is a slight angle in the pelvis, the weight is too heavy for you:
Execution Features
- The classic bridge exercise is performed with your own weight, without the use of additional equipment.
- Starting position: lie on your back, bend your knees, place your feet shoulder-width apart, arms lie along your body, palms facing down. Make sure that your knee joints, shoulders and hips are aligned.
- We raise the pelvis above the floor and place all the emphasis on the feet, fix it and return to the starting position. At the top point, squeeze the buttocks as much as possible. We try to raise the pelvis as high as possible without lifting the feet from the floor. We return to the starting position slowly, without jerking.
- It is recommended to do 3 sets of 10 times. Each approach requires full dedication, otherwise the result may be delayed. A burning sensation in the buttocks indicates that the exercise was performed correctly.
- We include the exercise in the training program 2-4 times a week. The quantity will be dictated by the goal.
The technique for performing a gluteal bridge is quite simple and does not require any special preparation from you. The task is suitable for both beginners and professionals. The difference will be in the frequency of exercise, the presence or absence of weights, and the type of gluteal bridge chosen. Regular training will change the shape and size of the buttocks, as well as increase muscle strength.
It is important not to confuse the standard pelvic lift with the gluteal bridge, the technique of which is slightly different. The difference lies in the position of the shoulders. When raising the pelvic joint, the shoulders are on an elevation (bench, box). During the glute bridge, keep your shoulders pressed to the floor.
Execution options
Classic without weights
The technique is no different from that described above.
With elastic band
The simplest and most affordable weighting option. We wrote about performing this variation of the gluteal bridge in the article It’s realistic to pump up your buttocks at home: what exercises and equipment are available to you at home?
With pressing, bringing the knees together
This complication of actions will allow you to load your buttocks even more.
How to do it correctly: after you strain your buttocks at the highest point of raising the pelvis, you need to bring your knees together and spread them as many times as possible, as in the abduction-extension simulator . Believe me, your buttocks will simply burn from the pumping !
On one supporting leg
The single-leg glute bridge allows you to better work each leg separately.
- First option. Starting position: lying on your back, one leg bent, the second shin lying on the first knee. As you exhale, raise your pelvis, not forgetting about your straight, tense back, hold for 2-3 counts and, inhaling, return to the starting position.
- Second option. Again, the starting position is lying on your back, one leg bent on the floor, the other straight extended upward. The technique is the same:
On fitball
A fitball (like other unstable support) is a good complication for the gluteal bridge. This way you will have to additionally concentrate on balance and the stabilizing muscles will come into play.
- First way. The shoulders and shoulder blades are on the fitball, the legs are shoulder-width apart, and the feet are pressed to the floor. Exhale with effort and raise the pelvis, pausing for a couple of seconds at the highest point. Slowly return to the starting position.
In this version, the ball acts as a bench. Believe me, it is difficult to stay on such a support, but thanks to this, the stabilizing muscles are included in the work.
- Second way. We place our feet on a fitball and raise our pelvis until a straight line with our torso is formed. Keep your balance! Slowly, rolling the ball back, we return to the starting position.
With weight
With dumbbells
The most obvious and fairly convenient weighting option. What we like about this option is that you can throw the weight on yourself without much difficulty. For example, lifting a barbell on your own is much more difficult!
The technique is not original: we lie down on the mat, bend our knees. We take a dumbbell in our hands and place it on our hips, holding it with our hands.
Raise the pelvis and remain in this position for 2-4 counts, with maximum tension. After this, we lower ourselves without touching the floor with our buttocks! Hold the weight with your hands the entire time you perform it so that the axis of the load does not shift from the buttocks.
You can also perform kettlebell on your butt!
With pancake
The technique for performing a pelvic lift with a weight plate is the same as with dumbbells. You can make it more difficult by doing it from a bench - this allows you to achieve greater amplitude!
Useful training video:
From the bench
There are 2 ways to sit on a bench: you lie down with either your upper or lower body on an elevation - the main thing is to make it comfortable and safe:
What is important to consider:
- It is also important to consider: this option of lifting the pelvis with emphasis on a bench is possible without injury only for flexible people - if you have problems with this, it is better to abstain!
- Ideally, the required bench height is 40 cm . However, you should experiment with different benches to determine your individual, comfortable height, which will help you perform the exercise with maximum involvement of the gluteal muscles.
- The emphasis on the bench should be on the lower edge of the shoulder blades - so that when you lift, you can easily rest your shoulders on it.
- While lifting the barbell, you should not help yourself with your elbows or rest your neck against the support : this can lead to pinching of the muscles and blood vessels.
- If you have one bench in your room, but it doesn’t suit you, you can place a rug folded several times under your butt. If, on the contrary, you are already high, then take a banal step platform.
If you want to further complicate the technique of performing an exercise on a bench, use two elevations of the same height. This will increase the range of motion of your hips to perform a bridge, look at the photo:
You can also add a knee tuck at the peak point or lift one leg up for more work on each of the buttocks. You can also bend one leg at the knee and perform a pelvic lift, first on one leg, then on the other. Of course, these options are for experienced trainees!
In the leg curl machine
Lying pelvic lifts are a more advanced version of the gluteal bridge, which is performed on a lying leg curl machine. Don’t be afraid, this option has a big advantage: you can easily change the working weight and not be afraid of injury, because it is fixed.
You will also have a given trajectory of movement, so it will be easier to perform the exercise.
How to do:
- Lie with your shoulder blades on the edge of the machine bench. Place your legs shoulder-width apart and press your feet to the floor. The roller is located on the line of the hip bone . Hands are on the bolster, and the pelvis is in the canopy.
- Using the force of your buttocks as you exhale, lift your pelvis until it is parallel to your body. Hold for 2 seconds at the top and squeeze your buttocks tightly. Feel the tension in your muscles.
- Lower your pelvis slowly and under control, making sure that the tension does not go away from the muscles! Don’t fall like a fallen willow and don’t sit on the floor at the bottom of the exercise! Repeat as many times as necessary.
Visually:
With a bar and a barbell
Lifting the legs and pelvis with a barbell while lying down is the most inconvenient option, in our opinion. Because you have to independently support the weight of the barbell in the absence of a given amplitude - the possibility of injury is high.
What to pay attention to:
- There is only one correct position of the bar: on the bend of the legs and body .
- As you perform the movement, make sure that the bar does not roll forward or backward across your body.
- It is strictly forbidden to place the barbell on your stomach.
The technique for performing with a barbell is the same as without a barbell.
There are 2 types of bars: Olympic long bar weighing 20 kg and curved short bar from 10 kg. We recommend that you use the second type. But no matter which one you choose, remember that if you feel uncomfortable, painful or uncomfortable, you can put a cushion or towel under it.
People often ask how to lift a barbell? Ideally, the safest and most convenient option is to have someone put it on you, but if a faithful friend is not nearby:
- “Roll up” the barbell over your outstretched legs, if the height of the plates allows you to do this (classic - from 10 kg, crossfitter - from 5 kg),
- place a barbell with a small weight on your hips while sitting on a bench and step down from the bench,
- place a barbell or step platform on both sides - this will create additional space between the bar and the floor,
- overcome your shyness and ask the most handsome guy in the room to help you!
It is most convenient to perform a gluteal bridge with a barbell on a bench:
In the Smith machine
We place a bench next to the machine and lie down on it so that the fulcrum is on the shoulder blades, and the bar is on the line of the hip bone . We recommend that you hold onto the bench with your hands - this will make it easier to make effort when lifting the weight.
Starting position: legs bent and standing shoulder-width apart, toes turned out, pelvis tilted. By tensing the gluteal muscles, we raise the hips to a straight line with the body. At the final point, we linger for a few seconds, squeezing the muscles, then slowly lower ourselves without relaxing.
Do not hold your breath: as you exhale, raise your pelvis, while inhaling, lower it.
The Smith pelvic lift is ideal for those just starting to exercise and those who have poor balance.
Which glute bridge option is best? In fact, each of them is good and effective in its own way: the selection criteria are your comfort, personal preferences and the availability of equipment.
Variations of the gluteal bridge
There are several options for performing the gluteal bridge, which allows you to diversify the training process, increase the complexity of the implementation, and not get tired of constantly repeating the same “bridge.”
Those who are shy or think that they will be looked at askance can do it at home, as long as they do not have to use additional weights. This is especially true for men.
Bodyweight glute bridge
Gluteal bridge
To do a glute bridge, you need to lie with your back on the floor, put your arms at your sides, and bend your knees so that both feet, shoulder-width apart, are firmly on the floor. The back should be in a neutral position.
Raising the pelvis is carried out with the entire emphasis placed on the heels. When lifting, you need to rest your heels as much as possible on the floor surface and squeeze your buttocks. You can stop while moving upward only after a bridge has formed, when the body from the knees to the shoulders does not form one line. You should stay at this point for a couple of seconds, continuing to squeeze your buttocks.
You must descend slowly and carefully. When planning to do another approach, you cannot relax your muscles. To achieve a truly significant effect in a shorter period of time, make sure that the amplitude of the movement remains the same and does not decrease with each new approach. In total, you need to try to make at least three “bridges”, giving all your best to failure.
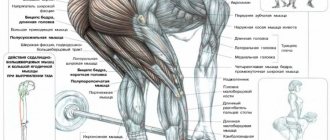
Glute bridge with barbell
Glute bridge with barbell
You can lift the barbell not only from the chest, but also by lifting the pelvis. Of course, such a performance requires appropriate preparation, since the maximum load is taken. Women involved in bodybuilding are recommended to take 113, and men - up to 182 kilograms. Such heaviness instantly deprives the gluteal bridge of its “for the weak” status.
If the level of training does not allow lifting such a weight, and the weights are less than 60 kilograms, then the barbell is used with an Olympic bar. It has a wide girth, but weighs 10 or 15 kilograms. Olympic-style discs require a high lift. Otherwise, it will be difficult to place the barbell comfortably on your hips.
The projectile must be placed closer to the perineal area. A pad or towel, which is used when doing squats with a barbell and other similar exercises, can help relieve excess tension. Thanks to this, there will be no marks left on the skin. Both shoulders and shoulder blades should be pressed against the bench, with emphasis placed on the heels when lifting.
Correct execution is indicated by the placement of the knee joints, hips and shoulder girdle on the same straight line. As with a regular bridge, at the top point they linger for two seconds, keeping the gluteal muscles squeezed. While lowering the bar, make sure it does not touch the floor until the second repetition begins. In total, it is recommended to do at least 3 approaches with 10-12 pelvic lifts in each.
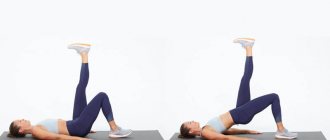
Glute bridge with one leg raise
Single Leg Glute Bridge
It is performed with a shock absorber or barbell, and without weighting. If a barbell is used, the apparatus is lightened.
To take the starting position, lie on the floor, bend your knees, and rest your feet on the floor. The leg is raised up, the knee is pushed closer to the chest.
They make a bridge by pushing off the floor, while the toe may come off. The thigh should stretch and the pelvis should rise. When lowering, you need to completely relax, and only then do the repetition.
If some aspects of the execution technique are not entirely clear, it is better to watch the video and only then start performing it. A visual aid will allow you to do the gluteal bridge without mistakes.
There is another variation of this exercise called the reverse glute bridge, performed on an elevated platform. It requires the use of a bench or other support. A shock absorber can be used here.
Take the starting position, but only the feet are placed on the bench, and the pelvis is close to the hill. As they rise, they move closer to the bench, and raise their right leg diagonally.
All emphasis is placed on the left heel. The right leg should be raised so that a diagonal line passes through the thigh, that is, from the ankle to the shoulder. Hold the top point for a couple of seconds, when lowering, do not touch the floor, but immediately do a repetition, the number of which should be maximum.
What to replace it with?
Should I replace the pelvic lift exercise with squats and deadlifts ?
Of course not ! And the reason is obvious: these exercises have different loads.
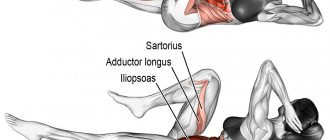
In the bridge, it is aimed at the extensor muscles at the moment of shortening of the gluteus maximus muscles. In squats and deadlifts, the gluteus maximus muscle experiences maximum tension in an elongated state.
Therefore, you can do a bridge with 100 kg. on a barbell, but at the same time squat and deadlift 20 kg. We recommend doing glute bridges once a week, with a medium working weight, up to 10 repetitions for each approach.
How to determine working weight in the gym?
The benefits and harms of the gluteal bridge exercise
Of all the exercises in the gym that shape the buttocks, this is the safest exercise.
Harm can only be caused by incorrect execution technique, excessive weights and strong deflection of the lower back, which is unacceptable in the exercise.
The gluteal bridge should not be performed in cases of exacerbation of injuries or inflammation in the lumbar and sacrococcygeal spine.
Its main advantage is safety , because the exercise can be performed without weight during the period of recovery and rehabilitation after spinal injuries. The bridge allows you to effectively work the gluteal muscle groups without compression on the spine, for example, as in squats and lunges with a barbell.
When performing a bridge, the quadriceps and back are not involved, which allows you to qualitatively refine the buttocks, which lack load or volume. This is also a universal exercise for home and gym, since the weight of the load can be used from literally anything - from dumbbells and elastic bands to special exercise equipment.
Reviews
Based on feedback from visitors to the hall, we have compiled the main and most important advantages of this exercise:
Marina: I have very big problems with my knees and this is practically the only exercise that the doctor and trainer allow me to do to lift my buttocks!
Bone Wide: yes, the load on the knee joint in the gluteal bridge is not axial and is minimal. So if your knees hurt when squatting, then don’t worry, there will be no pain in this exercise even with weights. The same applies to back problems. There is no axial load on the spine, which means that pelvic lift can be performed for protrusions, hernias and other back problems (but after consulting a doctor).
Olga: I’ve been doing glute bridges for a couple of months now, I’ve eliminated squats and you know, varicose veins have stopped bothering me as much as before.
Broad Bone: Again, we repeat that there is no axial or impact load during this exercise (as when running or jumping) and does not create a lot of tension in the legs (as when doing squats with weights or other movements performed while standing). So varicose veins are not a problem here!
The truthful answer: is it possible to play sports with varicose veins?
Technique for performing the gluteal bridge in Smith
To perform this variation, place the bar at bench level and a short distance apart. The height of the bench should not be too high, approximately to knee level.
- Place your shoulder blades on the bench so that your pelvis is directly under the bar. The bar itself should be located under the ilia, but above the pubic bone. Place your feet the width of your pelvis, the angle at your knees should be straight.
- Push the bar up with your pelvis, removing it from the clamps, while holding it with your hands slightly wider than your pelvis. Tighten your stabilizer muscles.
- As you inhale, slowly lower your pelvis down, but do not bend your lower back too much, that is, you do not need to touch the floor with your pelvis.
- As you exhale, make a faster movement using your buttocks, bringing your pelvis to the level of the bench. There is no need to raise your pelvis higher than the bench either. Contract your buttocks as much as possible, holding the tension for a couple of seconds, then slowly lower down. Push your heels off the floor.