Greetings, my readers. There is one wonderful exercise that many people forget about. Even those who regularly engage in fitness and other activities. Meanwhile, it is incredibly useful, accessible, and most importantly, it’s easy to do. And it benefits both your figure and your overall health! This exercise is the gluteal bridge! Next I will tell you in detail and clearly how to do the exercise correctly, what its types are, and what it is all about. And most importantly - what benefits does it bring, and why is it necessary for everyone!
What is a gluteal bridge?
The glute bridge is a multi-joint movement that activates the glutes and stretches the hips. Another name for the movement is pelvic lifts. They are performed on the floor. Why are such lifts needed? Of course, not only for a beautiful, strong butt.
Since the benefits of this exercise are enormous, and are not limited to strengthening the gluteal muscles.
Dr. Stuart McGill, world famous for his research on the spine, in an interview with Strength and Conditioning Journal says: “The gluteal muscles are connected to the pelvis in terms of their biomechanical and anatomical influence. This connection makes this muscle group actually the main power generator.”
Let me break it down for you: hip extension requires the same strength that is needed for many other important movements. For example, for jumping, swinging a bat, running, hitting a ball and many others. This means that the glute bridge can help anyone who plays sports improve their performance. Or maybe become more agile and resilient.
Gluteal bridge what muscles work?
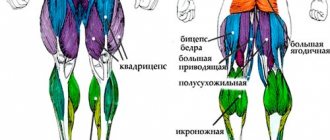
The main muscles working during this movement are the gluteal muscles: middle, small and large. Additionally, the exercise involves the muscles of the thighs (back and front), as well as the calves, core muscles and spinal extensors.
Varieties of movement allow you to maximize the use of all these muscles.
Types of gluteal bridge:
- with lifting on one leg in the form of a support (one-sided bridge);
- classic traditional (described below);
- with weight (with dumbbells, barbell or plate);
- with elastic at the hips;
- lifting on a bench, on a fitball or on a chair.
But it’s best to start performing the gluteal bridge with the classic version.
This is exactly what I will tell you about.
Why is a glute bridge not what your glutes need?
Below I will simply refer to these actions as “bridges” since they are not directly related to the buttocks. Firstly, it is ugly, looks strange from the outside and in most versions is inconvenient to perform (we are talking about the version with weights).
Now seriously and to the point.
The main reason for my rejection is the lack of transferability to everyday skills or results in truly effective exercises (squats and deadlifts).
The reason is simple - in the bridge, the maximum load on the extensor muscles of the hip joint occurs at the moment of shortening of the largest and strongest muscles - the gluteus maximus muscles. What happens? Tension of the muscle in a shortened state leads to painful but ineffective contractions, since in this position the muscle develops the least force. Yes, there is high electrical activity in the muscle because it is trying to contract, but the lifting force is minimal and it is easy to cause a spasm. But do we really need muscle spasm? In squats and deadlifts, the gluteus maximus muscle is forced to develop maximum tension in the elongated position, and in the shortened position the muscle activity is minimal, that is, the situation is exactly the opposite of the bridge. Therefore, transfer of training is not observed. You can bridge as much as you want, but you'll also be bad at squatting and deadlifting.
Now let's look at the situation from the point of view of people who don't care about muscle functions and need to increase the size.
But here too we will be disappointed. Low contraction efficiency leads to a redistribution of the load to other muscles. What muscles are these? The back of the thigh, and the adductor major, as well as the quadriceps muscles. We wanted to isolate the gluteals, but it turned out as always.
I do not consider the bridge to be an exercise with a high risk of injury for healthy people, although instead of a useful axial load in a neutral position, the spine receives a shear load in a “stooped” position. The risk is only high for people who already have back problems, especially if they decide to use significant additional weight.
- Or maybe we’ll put an elastic band on our legs and then load our buttocks? And again, by the way, the additional load on the muscles from the elastic band on the muscles in the situation of feet standing tightly symmetrically on the floor is minimal.
- What if you do it on one leg? We will increase the activation of compensating muscles and the load on the spine, while at the same time reducing the load on the gluteus maximus muscle.
- Or maybe we’ll stand on an unstable support? On an unstable support, the load is redistributed to the distal parts of the kinematic chain, and again the gluteus maximus is out of work.
Summarize. If you don't need normally functioning gluteal muscles and hip extensors in general, do a bridge.
I wish you health and thoughtful actions in the gym!
Author: Sergey Strukov
Gluteal bridge benefits
As I already said, this movement will help make your buttocks firm and beautiful. But the benefits don't stop there:
- spinal muscles will be strengthened, posture will improve;
- the back surface of your hips is perfectly stretched;
- activity is good for the spine - it stretches and strengthens;
- lumbar pain will decrease or even completely go away;
- discomfort and tension in the knee joints will go away;
- your muscle imbalance will be corrected;
- the buttocks will become more voluminous;
- the waist size and “barrel” will decrease;
- in general, you will be able to lose weight, because movement burns calories well;
- the tummy will also shrink and become flatter;
- your shins will tighten, your legs will generally pump up and become stronger;
- plus the muscles needed for running and jumping gain strength;
- blood circulation in the pelvic organs is activated;
- in general, the tone of these organs improves;
- for men, blood activation means improved potency;
- and for women – prevention of all kinds of “female” ailments.
Gluteal bridge - execution technique
Everything here is quite simple. But in order to do everything correctly, it is important for you to know several important nuances and avoid common mistakes. Be sure to do the bridge on a gymnastics mat (rolled, folding) or at least on a regular mat. And don't forget about comfortable clothes.
5 steps on how to do a glute bridge
- Lie on the floor on your back, arms along, legs bent at the knees, feet shoulder-width apart.
- Pull your feet closer to your pelvis, keeping your back in a neutral position.
- Pressing your heels as hard as you can, lift your pelvis up and squeeze your buttocks at the same time.
- Stop at the top for a second or two at the moment when your body from your shoulders to your heels seems to form a line.
- Then start lowering - smoothly, carefully and quite slowly, relax at the bottom, rest for a couple of seconds, and repeat the movement.
Glute bridge with barbell
A weighting agent will help increase the load. How to do:
- Starting position: lying on your back, legs bent, feet parallel, hip-width apart. The distance between the heels and the pelvis is about 30 cm.
- Press your head, shoulders and hands tightly to the floor. Fix the barbell (or other weighting material) on the hip crease.
- Raise your pelvis 10 cm from the floor and, as you exhale, contract your gluteus maximus muscles, thus opening your pelvis. Hold at the top for a couple of seconds.
- As you inhale, relax your buttocks and return your pelvis to its original position (10 cm from the floor).
- Do this for a minute.
Glute bridge with maximum impact
Another important point: when ascending, inhale smoothly, and when descending, exhale slowly and deeply.
The effect will be maximum if you ensure that your amplitude is the same and does not decrease with subsequent repetitions.
You can also do a spinal workout for better results. To do this, first slowly lift the pelvis off the floor. We do this vertebra by vertebra from the tailbone - up. Then the lumbar vertebrae are included in the lifting, followed by the thoracic vertebrae.
When lowering, the sequence is reversed: from the thoracic region to the lumbar region.
We perform the exercise smoothly, without jerking.
To get a good result, you should do 3 sets of 10 times, 3 times a week. You can start with 5 reps, or even 3 if you are a beginner and your level of preparation is weak or simply non-existent.
To strengthen and make your legs stronger, perform a one-sided bridge. With this, one of your legs will serve as a support while standing on the floor. The second will be suspended when the ankle is placed on the knee of the first. So the load falls as much as possible on the first leg. Once done, switch legs.
By the way, if your dream is beautiful, pumped up buttocks, do the same exercise, but with a band on your hips, or with your knees together.
In the second case, you should press your knees as close as possible to each other at the top point. Due to this, the buttocks will simply “burn” and quickly tighten up!
“Bridge”: the benefits and harms of exercise for human health
The brain, including the spinal cord, is the most important part of the human body. Therefore, supporting the muscular corset of the back and the flexibility of the spine provides significant benefits. Spinal injuries can leave a person confined to a wheelchair for life.
The spinal column is securely fixed by ligaments and muscle tissue. They serve as protection that protects bone elements, and, consequently, the spinal cord from injury.
In addition, thanks to the elasticity of the muscles, the mobility of the spine is ensured, and its deflections and straightening can be easily performed.
By providing the “bridge” exercise with flexibility of the spinal column and training the muscles by stretching the back, a person fully controls his movements, develops excellent coordination, preventing the development of diseases such as muscle atrophy, neuropathic pathologies, and osteoporosis.
By the way, a person’s breathing largely depends on the elasticity of the spinal muscles and the flexibility of the spine, since the mobility of the diaphragm is partially ensured by the work of the musculoskeletal skeleton. Therefore, the bridge exercise is useful for many diseases of the respiratory system. And supporting the proper functionality of the spine and spinal cord guarantees deep sleep and a reduction in nervous disorders.
By performing a gymnastic element 2-3 times a week, you can achieve the following results:
- strengthen the deep back muscles and increase the flexibility of the spinal column, improving posture;
- increase blood flow to the cartilage tissue located between the vertebrae and, thus, reduce the risk of their premature wear;
- eliminate the possibility of vertebral displacement;
- eliminate calcium deposits in the area of the cervical vertebrae;
- increase coordination of movements;
- improve the functionality of joints;
- increase lung volume as the chest expands.
However, you should not assume that the “bridge” exercise makes it possible to get rid of almost any problem associated with the spine. In fact, you can cause significant harm to the body by performing the element incorrectly. Excessive stretching can lead to significant pain and put the “athlete” out of action for a long time.
Despite the fact that in any school students are taught the exercise of how to stand on a “bridge,” there are contraindications to this type of gymnastic exercise. These are mainly diseases of the spinal column. Even if the exercise is recommended as part of physical therapy, it is better to master the element under the guidance of a competent instructor who is familiar with the technique of performing the “bridge” exercise in great detail.
Common mistakes
Here are the possible errors:
- the heels cannot be lifted off the floor - on the contrary, they must be “pressed”, as it were;
- It is important not to relax the abdominal muscles, but to tense them at both the upper and lower points;
- keep your neck relaxed and do not lean on it;
- do not move your legs close to your pelvis;
- try to feel every movement, do not do everything simply mechanically;
- below, do not relax completely;
- Do not hold your breath under any circumstances (if you train statics for a while, at the top point of the movement after inhaling, exhale, etc.).
Glute Bridge Variations and Progression
Once you have mastered the basic movement, you will have the opportunity to learn new variations that will allow you to further progress and improve your results.
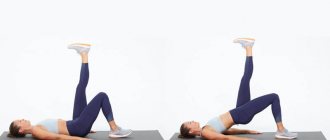
Single leg glute bridge
This exercise is great for further isolating the glutes and really builds muscle strength.
- Lie on your back, bend your knees and place your feet on the floor. Then straighten one leg up (make sure the sole of the straightened leg is pointing towards the ceiling).
- Engage your glutes by squeezing them and lift your hips up off the floor and your foot toward the ceiling. At the top of the movement, make sure your body forms a straight line from your knees to your shoulders.
- At the top, pause and squeeze your buttocks as hard as possible. Hold for 1-2 seconds and then slowly return to the starting position.
- Switch legs and repeat.
Glute bridge with elastic band/expander
To further isolate your glutes, increase resistance, and create tension in the target muscle group, use a resistance band or resistance band as you perform the exercise.
- Wrap the elastic around your thighs, just above your knees.
- Lie on your back with your feet flat on the floor and knees bent.
- Engage your glutes by squeezing them and lift your hips off the floor by lifting them up. At the top of the movement, make sure your body forms a straight line from your knees to your shoulders.
- At the top of the movement, pause and squeeze your buttocks as hard as possible. Hold for 1-2 seconds and then slowly return to the starting position.
- Switch legs and repeat.
Weighted glute bridge
You can tax your muscles even more if you add extra weight.
- Lie on your back with your feet flat on the floor and knees bent.
- Place some weight on your hips. This can be any heavy object, a barbell or dumbbells.
- Tighten your gluteal muscles by squeezing them and lift your hips up. At the top of the exercise, make sure your body forms a straight line from your knees to your shoulders.
- At the top of the movement, pause and squeeze your buttocks as hard as possible. Hold for 1-2 seconds and slowly return to the starting position.
- Switch legs and repeat.
Glute bridge with barbell
A barbell will allow you to increase the load in this effective exercise. With its help you will challenge yourself even more!
- Sit on the floor, place your feet in front of you, and roll the barbell over your outstretched legs onto your hips. Don't put the barbell on your stomach!
- Lie on your back, place your feet on the floor and bend your knees.
- Engage your glutes by squeezing them and lift your hips. At the top of the exercise, make sure your body forms a straight line from your knees to your shoulders.
- At the top of the movement, pause and squeeze your buttocks as hard as possible. Hold for 1-2 seconds and then slowly return to the starting position.
- If you want to progress, try moving to hip thrusts with your back resting on a bench.
Remember to be careful
Like every activity, this one also has its contraindications. Fortunately, there are few of them. You can safely do the bridge even with severe varicose veins (after all, there is no axial load), with protrusion and even hernia of the spine. By the way, the load on the knee joints here is minimal, so the movement can be safely done by those who have problems with their knees, even serious ones.
The gluteal bridge will be dangerous only for those who are, in principle, prohibited from all activities.
It is allowed even for pregnant women if there are no contraindications to activities in general.


