Push Up Guide
The ability to do push-ups is a skill that anyone can learn and constantly improve. Anyone should be able to defy gravity and perform a sequence of several push-ups. All it takes is work on yourself. As with any bodyweight exercise, it takes time for a person's body to get used to the movement, remember it and make it part of everyday life. The good thing is that our body gets used to this kind of exercise very quickly, but the bad thing is that it also quickly forgets the movement if we take too long a break between workouts. Regular exercise will help solve the problem.
Our body is a kind of biomachine; it learns and gets used to what is required of it. For push-ups, you need to have a strong torso, powerful chest and triceps, and core muscles. It is on the development of this muscle group that this exercise will focus. It will become easier as your body gets used to it, so don't forget to increase the number of repetitions and make the exercise more difficult.
Benefits of doing the exercise
The benefits of push-ups lie not only in working specific muscle groups. Push-ups of various types (classical, stand-up, parallel bars, etc.) are always included in the training process of martial artists, since their regular and intensive implementation increases the strength and speed of the blow, as well as the endurance of the muscles of the entire shoulder girdle, which is very important for a fighter of any level when working in full contact.
All of the above applies primarily to men. But what is the use of push-ups for women if they do not set themselves the goal of improving their fighting qualities or achieving hypertrophy of the pectoral muscles and triceps? Regularly performing push-ups consumes a large number of calories, which will be a kind of assistant in losing weight.
According to research, 30 push-ups burn about 60-80 calories. For comparison, 100 grams of boiled chicken breast contains 113 calories, and 100 ml of Coca-Cola contains 43 calories.
As a result of doing push-ups, metabolism improves and the lipolysis process proceeds much faster. Local load on the chest and triceps will visually improve muscle relief and “tighten” these areas, which is especially important for women during the recovery period after childbirth and breastfeeding. Regular push-ups will help remove excess accumulated fatty tissue and get rid of cellulite on your arms, which will only emphasize your athletic shape.
In addition, push-ups are an excellent way to prevent arthritis and bursitis. Studies show that subjects with early-stage arthritis performed 80 push-ups daily for four weeks, as a result of which almost 75% of them noted an overall improvement in well-being and the disappearance of pain in the joints.
The most common mistakes when performing the exercise
Elbow position
- Incorrect: elbows point to the sides;
- Correct: Press your elbows lightly and squeeze your shoulder blades together.
Body position
- Incorrect: sagging abdomen, chest;
- Correct: Keep your hips in line with your shoulders.
Position of hands
- Incorrect: hands further than the shoulder line, elbows in the shape of the letter T;
- Correct: the hands are in line with the shoulders, the elbows are in the shape of the letter A.
Perfecting push-ups in 30 days
This chart is a 30-day program to increase muscle strength in your upper body and abdominals.
The goal of the program is to gradually move from variations to the full version of this exercise in 30 days.
Approximate training plan for 30 days from scratch
| Day 1 | Day 2 | Day 3 | Day 4 | Day 5 |
| Scapular wall push-ups8–12 reps, 2–3 sets | Basic wall push-ups 8–12 reps, 2–3 sets | Basic wall push-ups 8–12 reps, 2–3 sets | Incline push-ups 8–12 reps, 2 sets | Incline push-ups 8–12 reps, 2 sets |
| Day 6 | Day 7 | Day 8 | Day 9 | Day 10 |
| Rest | Rest | Scapular push-ups on the floor 8–12 reps, 2–3 sets | Scapular push-ups on the floor 8–12 reps, 2–3 sets | Basic push-ups on the floor 8–12 reps, 1 set |
| Day 11 | Day 12 | Day 13 | Day 14 | Day 15 |
| Basic push-ups on the floor As many reps as you can | Basic push-ups on the floor 8–12 reps, 1–2 sets | Rest | Rest | Scapular push-ups from the wall Incline push-ups Basic push-ups on the floor 8–12 reps, 1–2 sets |
| Day 16 | Day 17 | Day 18 | Day 19 | Day 20 |
| Basic push-ups 4-6 reps, 1-4 sets *Record the number of reps and sets for this week | Basic push-ups 4–6 reps, 1–4 sets | Basic push-ups 4–6 reps, 1–4 sets | Basic push-ups 4–6 reps, 1–4 sets | Rest |
| Day 21 | Day 22 | Day 23 | Day 24 | Day 25 |
| Rest | Triceps push-ups 8–12 reps, 1 set | Diamond incline push-ups 8–12 reps, 1 set | Basic push-ups Triceps push-ups Diamond incline push-ups 8–12 reps, 1–2 sets | Basic push-ups Triceps push-ups Diamond incline push-ups 1 set, but as many reps as you can |
| Day 26 | Day 27 | Day 28 | Day 29 | Day 30 |
| Timed test! As many push-ups of your choice as you can in 3-5 minutes | Triceps push-ups 8–12 reps, 1 set | Diamond incline push-ups 8–12 reps, 1 set | Rest | Basic push-ups Triceps push-ups Diamond incline push-ups 1 set, but as many reps as you can *Record your progress to see your results |
Don't forget about technology and more!
- Hands and feet should be hip-width apart.
- Try to keep your fingers in line with your armpits.
- Keep your head and neck in line with your spine.
- Engage your core muscles to protect your spine.
- Keep your elbows slightly tucked in rather than too wide apart.
- Drink plenty of fluids during all your workouts.
- If it suddenly becomes difficult to maintain proper form, stop the exercise.
Scapular wall push-ups
- Stand facing the wall, at a distance of 1-1.5 m from it.
- Place your hands on the wall at shoulder height and shoulder-width apart, with your fingers slightly turned outward.
- Without bending your elbows, squeeze your shoulder blades together, pointing your chest toward the wall.
- Don't lower your hips or jut your chin forward. Maintain a straight line from head to toes and tighten your core muscles.
- Return to the starting position, that is, spread your shoulder blades.
Scapular push-ups on the floor
A low range of motion exercise that involves retracting and abducting your shoulder blades. Resisting gravity makes the exercise more difficult and develops strength.
- Get on your knees.
- Place your hands at the same level as your shoulders and slightly wider than them, with your fingers slightly turned outward.
- Stretch one leg first, then the other back. The body is straightened, the core muscles are tense.
- Without bending your elbows, squeeze your shoulder blades together, mentally directing your chest toward the floor.
- Don't lower your hips or move your chin.
- Spread your shoulder blades to return to the starting position.
Triceps push-ups
- Get on your knees.
- Place your hands so that they are in line with your shoulders, armpit-width apart, with your fingers slightly turned outward. The hands are placed a little closer together in this variation of the exercise.
- Extend one leg behind the other behind you, focusing on your toes, keeping your body completely straight.
- Lower your chest toward the floor as you slowly inhale, bending your elbows back toward the sides of your body. Keep your head, back and hips straight without relaxing your core muscles.
- Lower yourself until your shoulders are level with your elbows.
- Slowly return to the starting position and exhale.
Diamond incline push-ups
- Kneel down facing a bench or tabletop at a distance of 1-1.5 m from it.
- Place your hands on the edge of the bench with the index fingers and thumbs of both hands touching in a diamond shape.
- Extend one leg and then the other behind you, placing them hip-width apart. The body is completely straight.
- As you inhale, lower your chest toward the bench, slowly bending your elbows. Keep your back and hips straight and your core tight.
- Slowly return to the starting position and exhale.
- To make the exercise easier, spread your fingers a few centimeters.
What exercises will help you learn
So, our main goal is to strengthen the muscles of the arms and chest. There are a number of physical exercises that use the same muscles as classic push-ups, but they are classified as gentle. They provide a moderate load, which is just right for people mastering the push-up program for beginners.
Wall push-ups
This exercise mainly involves the muscles of the back, abdomen and arms, in particular the triceps. How to learn to do wall push-ups?
- Stand facing the support, place your hands on it at a distance approximately equal to shoulder width;
- As you inhale, bend your elbows, moving closer to the wall until your chest and forehead touch it;
- As you exhale, return to the starting position;
- Keep your body vertical, do not bend your back or lower back, tighten your abs. Only the back and arms work.
How to quickly learn how to do push-ups correctly using this particular exercise, since it practically does not involve the pectoral muscles? Start gradually moving away from the wall - the further you move away, the more your chest will be involved in the process. In the future, move on to push-ups from the bench.
Bench push-ups
This exercise works the triceps, front and rear deltoids, chest, back, abs and legs. As you can see, a full-fledged muscle atlas of the classic push-up has been drawn, which means you are on the right track. Learning to do push-ups from a horizontal support is more difficult than from a vertical one, but it is still easier than from the floor, which is why the exercise is classified as push-ups for beginners.
- Find a suitable bench or chair (the higher the support, the easier it is to do push-ups)
- Take the starting position: lying down, hands on the bench, body straight, body tense, look down;
- As you inhale, begin to push up, bending your elbows to an angle of 90 degrees, lowering down to the support;
- As you exhale, return to the starting position;
- Don't arch your back, don't stick your butt out.
To learn how to do push-ups easily in just a week, every day look for a horizontal support slightly lower than the previous one. Thus, not today or tomorrow you will already start working on the floor.
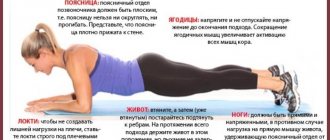
Plank on extended arms
This exercise allows you to increase the athlete’s endurance, strengthens the core muscles, and forms the foundation of correct technique. To learn, study the rules:
- Take an emphasis lying on outstretched arms, spread your legs shoulder-width apart;
- Tighten your chest, abs and buttocks, keep your body straight;
- Lock the position for 40-60 seconds;
- Do 3 sets with a break of 1-2 minutes;
With each workout, try to increase the time spent in the plank, bringing it up to 4-5 minutes.
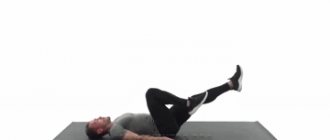
Knee push-ups
The exercise is also called female due to the lighter load on the target muscles. But this does not mean at all that they have no place in the push-up program for beginner men, because they perfectly prepare the muscles for a full load. How to learn to do push-ups this way:
- The technique of execution is practically no different from the algorithm for the classic subtype, the only difference is the emphasis not on the socks, but on the knees;
- Take a position lying on outstretched arms, body straight, gaze forward, legs on your knees, crossed at the ankles and raised up;
- As you inhale, lower yourself down to the lowest point, as you exhale, rise smoothly;
- Continue doing push-ups for the required number of reps and sets.
Methods of push-ups and features of their implementation
Classical
There are two ways to position your hands for a classic push-up - narrow (palms touching each other and located directly under the center of the chest) and wide (palms slightly wider than shoulder-width apart). In the first case, the main load goes on the triceps and the inner side of the pectoral muscles, and in the second - on the pectoral and deltoid muscles. For the harmonious development of the muscles of the body, it is recommended to do both alternately, for example, every other day.
How to do it: The palms of the hands and the toes of the feet rest on the floor, the body is straight, the arms are straightened. Bending our elbows, we lower ourselves to the floor, touch it with our chests and straighten our arms again. Everyone can regulate the number of exercises and approaches in one workout independently, according to their own strengths and desires; the main thing to remember is that it is important not just to do more push-ups, but rather to do it correctly.
Basic mistakes of newbies:
- When lifting, the arms do not extend simultaneously, but one at a time;
- The legs, torso and shoulders do not form a straight line, the body either sags or bends upward;
- When lowering down, the knees, pelvis or hips touch the floor;
- The lowering is incomplete - the chest does not touch the floor.
If you consistently perform all the necessary exercises every day, without skipping workouts, you will very quickly notice the result - within a week your body will become noticeably stronger, your arms will become stronger, and your abs will become tougher. And in a month, it is quite possible that you will already learn to do push-ups ten to twenty times in one approach - it all depends only on your diligence!
Weighted
If you have already mastered a simple push-up perfectly and your body requires additional stress, you can try a more complex option.
How to do it: the execution technique is entirely consistent with the classic one, but in addition a special weight vest is put on. Due to the lack of such equipment, many of us can replace it with a regular backpack with something heavy or a barbell disc placed on our back.
On the uneven bars
The question of how to learn how to do push-ups on parallel bars is probably of concern to many. I think everyone understands that this sport can only be practiced if the classic version is performed easily by you and does not present any difficulty.
How to do it: to perform this we will need a special simulator. During such a push-up, a person, unlike previous options, is in a vertical position. The hands are placed on the bars, the elbows are located as close to the body as possible, and not spread to the sides. Legs are bent at the knees, feet are joined together. By bending and straightening your arms, you move up or down on the simulator.
To find out the top fastest animals in the world, check out another article also posted on our website.
How to train yourself to do push-ups every day?
The army uses deep push-ups to make recruits stronger and more resilient. Soldiers must do push-ups every day. You, in turn, must train your body to do as many push-ups as you feel comfortable with: ten, twelve, twenty or forty, without exhausting your muscles. Get into the habit of doing push-ups at the same time every day and experience the benefits of this movement for yourself. For example, if you do only five times a day, in a month you will do 150, in a year 1800.
See also: how to increase the number of push-ups.
Challenge your limits and your body by simply increasing the number of push-ups over time. How to do it?
Plus one: increase the total number of push-ups per day by one. For example, on the first day of the month you do five, on the second day six, on the third day seven, and so on. At the end of the month there is an automatic reset and everything starts again. On the first day of the next month, do it again 5 times, etc.
Plus five : At the end of each month, you increase the total number of daily push-ups by five, that is, at the beginning of the second month you will have already performed 10 times.
Counting: Increase the total number of daily push-ups per day of the month. On the first day you do it five times, on the second you add 2 more times, on the third - three (total already 8). Continue until you reach the last day of the month, where you add the day of the month to the initial number you started with. At the end of the month, start over.
Countdown: Countdown is the exact opposite of the previous technique. You can comfortably do 5 push-ups, and there are 31 days in a month. You start by doing 5 + 31 = 36 times. On the second day you add 30 more to 5, on the third 29 and so on. On the last day of the month it will be only 5.
Up and Down: Add one each day of the week. On Monday it’s five, on Tuesday it’s six, on Wednesday it’s seven and so on until you get to Sunday. Then at the beginning of the week you start all over again and so on until the end of the month.
Common mistakes when doing push-ups
There are several mistakes that all beginners make at first. Let's look at each of them in detail.
Hands too wide
Many athletes believe that by placing their arms wider, they will shift more of the load to the pectoral muscles. This is partly true, but at the same time you will increase the load on your shoulder, elbow joints and ligaments many times over, which can lead to serious injury in the long run.
Incorrect elbow placement
Push-ups are not the same as dips. Here you will not be able to better load your chest by turning your elbows in different directions, but you are almost guaranteed to injure yourself.
Incorrect (incomplete) range of motion
If it is difficult for you to do push-ups at full amplitude due to insufficient physical training, it is better to hold off on this exercise for now. Remember: at the bottom, your arms should be bent at an angle of 90 degrees, only then you can get the maximum benefit from push-ups.
Back arch
A straight back is the main condition for performing push-ups correctly. The slightest deflection will immediately create a strong axial load on the spine. If you find it difficult to keep your back straight throughout the entire approach, you should additionally train your spinal extensors and abdominal muscles.
And in conclusion, we suggest watching a video that shows the errors described above.
One-arm push-up technique
This variation works great for your core muscles.
Here's how to do it: Step 1: Spread your feet twice as wide as shoulder width, or wider if you want for stability. Hands should be at the same level as your shoulders. Lower your head and look at the floor.
Step 2: Remove one hand from the floor and place it behind your back. Tighten your core muscles by pulling your stomach in. At the moment you are in perfect balance. Your shoulders should be parallel to the floor, your body completely straight.
Step 3: While still looking at the floor, slowly exhale and lower yourself. Keep your shoulders down, lower yourself as low as possible. At the lowest point, stop and go back.
During the exercise, the core muscles should be tense at all times. Your shoulders are parallel to the floor, otherwise you won’t be able to maintain your form and will fall, because the load on your working arm will be enormous.