Plank for weight loss - the best exercises for the whole body
The plank is an isometric exercise that provides a static, strength load on the abdominal and core muscles. During its execution, the abs, the area between the shoulder blades and the lower back, forearms, hips and buttocks are involved. It is presented in various versions depending on the complexity of execution, suitable for both beginners and professional athletes.
The plank works well as part of a routine, along with other exercises for problem areas. Before it, you definitely need to do a short warm-up, and after - stretching.
What does the plank exercise do?
As mentioned above, the plank exercise is primarily aimed at developing the abdominal muscles. It is easy to learn and gives the same results to both men and women. Regular planking makes the core muscles as strong and rigid as possible, which significantly affects the shape of the abdomen.
Among other things, the plank is one of the exercises that engages the main muscle groups, almost the entire body at the same time.
The main advantages of the exercise:
- Effectively trains the abdominal muscles
- Develops general endurance
- Engages the deep internal muscles that support the spine, pelvis and hips.
- Tightens the stomach and creates a good shape.
Video: real result of doing the plank in 30 days.
What is a plank?
The plank is an exercise that helps strengthen the rectus and oblique abdominal muscles. It has several different options, which differ in the complexity of implementation and the area that works in the process.
The exercise is quite popular in the fitness field. It is part of various comprehensive, functional training. Its varieties are found in yoga and Pilates classes.
Types of planks:
- classic - on straight arms;
- classic - on the elbows;
- lateral;
- with twist;
- with push-ups;
- with arm or leg extension.
There are many options for implementation. New ideas are constantly appearing to complicate the classic version. But for those losing weight, something else is important - is it possible to get rid of excess weight in this way, will such an exercise help to remove the stomach and sides.
Types of planks and exercise techniques
There are a variety of options for making the plank. The simplest one, which is recommended to start with, is the classic exercise. Having mastered the static pose, you can move on to types with complications that will allow you to achieve maximum impact on the muscles.
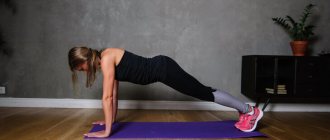
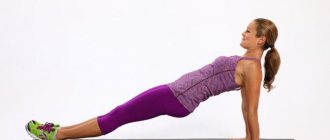
Classic straight arm exercise
The classic version involves fixing the body parallel to the floor on straight arms and toes. The weight is distributed between the supports, the back and legs are straight. The neck should not arch - it should be in a straight line with the rest of the body. The gaze is directed downwards and slightly forward, but the head does not rise.
After the exercise is mastered, instead of straightened palms, you can try leaning on clenched fists. The thumbs are turned towards each other.
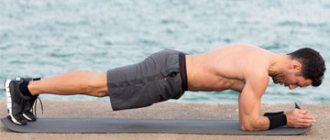
On the elbows
The difference from the classic version is the change in the position of the hands. Instead of resting on your palms, you need to bend your elbows. The palms are straightened and turned towards the floor.
How to properly stand in a plank on your elbows: your legs, back and neck are still in a straight line, your gaze is directed to the floor. The head does not rise forward or fall down. It is important to fix the body almost parallel to the floor line.
For people with poor physical fitness, the first time they perform it, it is allowed to stand, leaning not on their noses, but on their knees.
With one extended limb
For those who were able to master the classic version or the pose on the elbows, and steadily fix the body position for several minutes, a complication is offered in the form of stretching the limbs. You can alternately straighten your arms forward, fixing each position for 10 seconds. Also, the legs are raised up one at a time in a straight position so that the load on the gluteal muscle is felt.
Or you can remove your hand behind your back.
This option allows you to increase the load on the pectoral or gluteal muscles (depending on the straightening of your arms or legs).
IMPORTANT! When straightening the limbs, it is necessary to monitor the position of the rest of the body. The given straight posture should not change or bend.
Side stand
The side stand allows you to work the oblique muscles of the abdomen and enhance the overall effect on the abs. The position offers two options:
- on a straight outstretched arm;
- on the arm bent at the elbow.
The lateral part of the foot becomes the lower support. The legs and back are straightened and form a straight oblique line. The neck does not bend, the eyes look forward.
Raising the upper free arm or leg can be added to the side stand. In this case, the limb is fixed in a straight position. The arm rises, continuing the line of the shoulders. The leg is at an angle of 45°.
With transition
Dynamic execution of the exercise, alternating between the classic and lateral variants, is the most difficult. All muscle groups are worked out and the maximum number of calories is burned (among types of planks).
An example of performing a side plank.
Alternating positions occur every 30 seconds. The body is clearly fixed in the desired position. It is not recommended to practice this method until you have confidently mastered static poses, since you will not be able to achieve the desired result. The transition is effective if a person has already learned to stand in the plank for a long time and correctly.
With fitball
Exercise using a fitball is most effective for the abdominal muscles. Standing on straight or bent elbows, a person secures his feet on the ball. It may not be possible to maintain balance right away, since the fitball itself is not stable. By making efforts to hold the ball, the load will be transferred to the abdominal muscles.
Correct execution involves fixing the body in a straight line. The buttocks should not be raised up. The gaze is directed downwards, the head does not rise.
Does it help with weight loss?
The plank is a good strength exercise that affects the abdominal muscles. It effectively works through them and helps strengthen them. But for weight loss, this is not what is important, but a calorie deficit: you need to spend more than you eat.
To burn an impressive amount of calories, you will have to hold the bar all day! Therefore, there is no point in hoping that she will burn off the kilograms that have accumulated over the years.
But the plank can, even should, become part of a set of physical exercises combined with proper nutrition, as well as complex group psychotherapy for correcting eating habits.
Plank exercise for weight loss
Benefits of the plank
The plank is a good functional exercise that does not require special equipment, sportswear, or a lot of space. Almost anyone can do it. In addition, it has a number of other advantages:
- minimum amount of time to complete;
- there is no need to visit the gym, you can exercise at home;
- can be performed even after meals, no need to eat certain foods before and after training;
- has a small number of contraindications;
- improves overall well-being and coordination of movements.
The exercise is suitable for strengthening muscles, but it will not help you lose weight.
Elbow plank what muscles work
The plank supported on the elbows (forearms) involves little by little all the major muscle groups, but with a greater emphasis on the abs. Like many other exercises with your own weight, the plank acts globally and includes:
Main working muscles in plank
- Abdominal muscles:
- Direct
- Oblique
- Transverse
- Serratus muscles
- quadriceps
- biceps
- large buttocks
- shins
- Biceps
- Triceps
- Deltoid
- Deltoid
- Trapezoidal
- Extensor
- Lat
Contraindications
While performing the exercise, you need to listen to your feelings. If you feel discomfort somewhere, for example, pain in the joints or muscles, you need to stop immediately and wait until your physical condition is completely stabilized. If the pain persists, you should consult a specialist; it could be a pinching or sprain.
In addition, it is prohibited to perform the plank in the following cases:
- spinal injuries, displacement of intervertebral discs, hernia;
- high blood pressure;
- diseases of the cardiovascular system;
- postoperative period;
- during a cold or flu, in acute inflammatory diseases.
Girls during menstruation need to be especially careful when performing the exercise. Tightening your abdominal muscles can cause cramping, pain, or increased bleeding. It is also not recommended to perform the plank for pregnant women or women who have recently given birth.
Efficiency
As already mentioned, the plank is a type of exercise that helps strengthen the core muscles. Correct, regular exercise will help tighten your torso and make it more prominent. Efficiency and results are largely determined by the following factors:
- regularity: you need to do the plank at least three times a week;
- number of approaches: it is better to create a full workout that combines different types of planks;
- correct execution, strict adherence to technique;
- proper nutrition, healthy sleep, daily routine, correction of eating habits - without this, the bar will not give any results.
If you do the plank regularly for at least 30 days, you will notice the first results. Usually the condition of the skin changes: it becomes smoother, tighter, which creates a general impression of weight loss.
How long to stand in plank
The optimal time is selected individually. For an unprepared person, 10 seconds will be enough, while an athlete can withstand up to 10 minutes. What happens to the body as time increases:
- In the first 20-30 seconds, a feeling of tension appears, which increases with every second. At the same time, blood circulation in working areas increases, oxygen is actively supplied. The body spends about 5 calories on all this. For beginners this will be enough.
- After a minute, a feeling of warmth and slight trembling appears. It seems that the muscles have “clogged” and become dense and stone-like. Usually at this stage people give up because they don’t want to endure discomfort or pain at all.
- After three minutes, a “second wind” opens. Pain and discomfort subside a little, the body gets used to the load. At this stage, it is better to stop and start again - this way the training will be more effective.
- It is not recommended to hold the plank for more than 10 minutes - this is fraught with destruction of muscle fibers.
Most fitness instructors believe that it is better to do several repetitions of 30 seconds each than to stand for 3-4 minutes at a time. So the body will not have time to get used to the load and adapt. Each new approach for him is a new test, which will become more and more difficult to cope with.
Regularity of classes
Classes must be regular. It is best to spend a few minutes after completing morning exercises on the plank, when the body is already warmed up and ready for the load.
If you can’t immediately do the number of approaches required by the program, you can divide the lesson into two parts: one done along with exercises, the other 2-3 hours after dinner, shortly before bedtime. If there is also a workout in the evening, it is better that it also includes a plank.
If progress is not observed with regular exercise, you should pay attention to the following points:
- load intensity: if the body is accustomed to a regular exercise, you can not only increase the time, but try a more difficult version, and thus control the process;
- incorrect execution technique. In the next paragraph of the article, we will consider the correct sequence and typical mistakes of beginners.
The main thing is to understand that it is not so much the quantity that matters, but the quality of training.
How to do it right
The execution technique looks like this:
- feet are shoulder-width apart;
- the elbows are strictly under the shoulder joints;
- the gaze is directed downwards to the fingers, the neck is straight;
- the stomach is pulled in, there is no deflection in the lower back;
- legs, abdominal muscles and arms are tense.
The name of the exercise describes the technique: the torso should be extended in a straight line - a plank. There should be no deflections anywhere.
The technique seems simple at first glance. However, mistakes do happen, especially for beginners. The most common are the following:
- The pelvis is higher than the head. In this position, the load is redistributed and transferred to the muscles of the arms and forearm. In this case, discomfort is felt in the shoulder joints.
- Bend in the neck, lift the head. When performing the plank, you need to look down at your fingers. When you move your gaze forward, a deflection is formed in the neck, increasing the load on the cervical vertebrae. This is especially dangerous for people suffering from osteochondrosis.
- Elbows set too wide. Maintaining balance in this state is not easy. The load on the back muscles, shoulder joints and elbows increases. All this can lead to injury.
- Bend in the lower back. When performing the exercise, you must monitor your body position. It should be straight, like a bar, like a string. Otherwise, pain in the lower back may occur.
If you perform the plank incorrectly, you can avoid harming yourself. Therefore, you should not chase increasing the time; it is better to hold it for ten seconds, but correctly.
Execution technique
The elbow plank for the abs and other muscles is performed in almost the same way as the classic version on an outstretched arm, but it has its own nuances that need to be studied to obtain maximum benefit.
Let's look at how to do the elbow plank correctly. The algorithm of actions will be as follows:
- You need to take a lying position, leaning on your forearms
- Elbows should be shoulder-width apart.
- Your hands can be clasped together (to lighten the load) or placed parallel to each other for a more intense load.
- The body should be positioned above the floor in a straight line from the head to the feet. It is especially important to pay attention to the position of the lower back.
- You need to relax your shoulders and breathe freely. Now you need to fix yourself in this position as much as you can and maintain stillness.
- Rest a little and proceed to the next approach.
Control your body position. Burning and slight trembling in the muscles, slight staggering are natural. But severe pain and cramps are signs that the exercise should be stopped.
Also, many are interested in the question of how long you should hold the bar on your elbows, and what should be the number of approaches. All this is determined individually and depends on the state of the body and level of training. It is recommended to start with two approaches of 30-60 seconds, increasing these figures as the muscles strengthen and become accustomed to the load.
Let your priority be quality rather than quantity. To begin with, do not chase the number of repetitions and stand time, but hone your technique.
The world record for the elbow plank is eight hours, one minute and one second.
For beginners
Beginners only need 4-5 minutes of training per day. This time is enough to get used to the load and prepare for other, more difficult exercises.
Beginners can use the following program:
| An approach | lead time |
| First | 10-30 seconds |
| Second | 30-45 seconds |
| Third | 30-45 seconds |
| Fourth | 10-30 seconds |
If after one circle you still have strength, you can repeat it about 2-3 times. This workout can be done in the morning and evening.
The main thing is to develop a habit and do exercises regularly.
The 30-day plank – how effective is it?
There are probably no exercises that can compete with the bar in terms of versatility. The plank is a fairly simple, effective exercise that does not take much time, but at the same time “works” the whole body. By standing in the plank for five minutes every day, you can strengthen the muscles of your abs, back, arms and legs, and also work hard on your posture, flexibility and balance. Just some kind of holiday!
Another advantage of the plank is that it can be done anywhere and in any equipment. At home, in the gym, on the green grass, morning and evening, in pajamas or sportswear - the bar will always be equally effective.
A month is enough to see the first results. True, if you perform the exercise correctly and regularly. Do you promise not to mess around? Then let's go!
For men
The program for men is somewhat more difficult than for beginners and women. It involves the use of several types of planks in one complex with maximum development of the core muscles. Representatives of the stronger sex are usually able to hold the desired position longer due to the natural characteristics of the body, strong arms and back.
The program for men may include the following types of planks:
- classical;
- lateral;
- with alternate raising of arms and legs;
- with weights.
For each approach there is a separate version of the plank. The duration of one approach is from 45 to 60 seconds. Men can perform about 3-5 laps in one workout.
For women
It is biologically determined that excess weight in women mainly accumulates in the abdomen and hips. Because of this, representatives of the fair sex develop a huge number of complexes and lack confidence in themselves and their beauty. Wanting to correct the situation, they go on strict diets and torture their bodies with intense training.
But, in fact, you can lose weight without serious dietary restrictions. Once you change your habits, the excess weight will go away on its own. But old, harmful activities must be replaced by new, healthy ones. Another option is regular training, including a plank.
A program for women might look like this:
- approach one – classic plank on straight arms or elbows;
- second approach – lateral (on the left hand);
- third approach – lateral (on the right hand);
- approach four - again classic on straight arms or elbows.
For the best effect, you need to make about three such circles. The duration of each approach is 30-40 seconds.
Kinds
- Classic straight arm plank.
Difficulty : In the context of planks, this one is the easiest.
Starting position: legs straight, feet also straight, located next to each other and resting on the floor, arms are shoulder-width apart, hands are located directly under the shoulders, palms and wrists form a right angle. The head should form a straight line with the body.
Execution : while exhaling, take the starting position, tense all muscles as much as possible and hold the position. Make sure your body is straight and positioned correctly. The pelvis should not drop down, nor should the lower back. Breathe evenly and deeply. Don't hang by your hands, stand strong like 1 in 300 Spartans.
- Classic elbow plank.
Difficulty : medium.
Starting position: the starting position will be the same as in the classic version, but your arms will need to be bent at the elbows. The hands are also positioned shoulder-width apart; a right angle should form between the shoulders and the body, that is, the elbows should not move forward or back. Brushes can be connected into a lock.
Execution: Take the starting position and fix it. It is important to maintain an even position of the body and not allow any parts of it to “sag”.
- Straight arm side plank.
Difficulty : In the context of planks, high.
Starting position: lie on your right side and rest your right hand on the floor. Make sure that the hand is positioned in the same vertical line as the shoulder (a right angle will form between the shoulder and torso).
The legs can be placed either one in front of the other (preferably the right one in front of the left to provide stable support), or one on top of the other (this option is more difficult, as it requires maintaining balance). The left hand either lies on the left side, or is placed on the belt, or is raised up. Turn your head forward or to the left.
Execution : while exhaling, take the starting position and hold it for a minute. Make sure that the body is straight and the pelvis does not deviate to the side. The exercise must be performed on both the left and right sides.
- Plank with twist.
Difficulty : not an exercise, but insanity.
Starting position: rest both hands on the floor, and turn the lower part up through one of the sides.
Execution : Bring your right leg forward and place it next to your right hand. Watch your hips - they should not sag or go too high. Return the leg to IP, repeat with the left leg. This is 1 repetition.
- Plank and push-ups.
Difficulty : medium if you can do push-ups.
Starting position : take the position of a classic plank.
Execution : Raise your body to the top push-up position using your arms. Pause at the top, then change the direction of movement and return to resting on your elbows. This is 1 repetition.
- Plank with arm extension.
Difficulty : for biorobots.
Starting position : take the position of a classic plank.
Execution : Raise and straighten your left arm, keeping it parallel to the rest of your body. Return to the starting position, then raise your right arm, repeat the specified number of times.
Do you know which exercise is the most effective for working your abdominal muscles? And we know and revealed this secret to you in the article “The best exercise for the abs”
Body correction with a plank
The main benefit of regularly doing the plank is strengthening the muscle corset. The body changes visually, becomes stronger and more toned.
In addition, when performed correctly, it can bring the following benefits:
- strengthening the back muscles, which is especially important for people who lead a predominantly sedentary lifestyle (office employees, schoolchildren, students, retirees);
- reduction of pain in the neck and spine - the plank exercise is often included in the complex of physical therapy prescribed by a doctor;
- increasing endurance, since standing in the plank for a long time is not easy, muscles tense, trembling appears, and you need to overcome yourself in order to defend the required time;
- improved blood circulation, active supply of oxygen to cells;
- improved mood - when performing any physical exercise, the production of hormones is activated, including dopamine and serotonin.
How to do this exercise correctly?
Perhaps the most important question in this article is how to properly stand in a plank on your elbows. After all, an exercise with the wrong technique will have as much benefit for the muscles as a postal sparrow that was sent a liter bottle of whiskey. It will just be a fun time and nothing more. And your sparrow can overstrain itself and get sick, so be careful with this.
If you are determined to do everything wisely, then first of all you need to remember that your entire body should form a straight line , no arching in the lower back, no raised pelvis. From head to toe everything is in one line. At the same time, your abs should always be tense, you cannot relax. And the lower back should be rounded.
Go ahead. Elbows. Our elbows should be exactly under our shoulders. It is necessary. The knees should not be bent; remember one straight line.
If your knees are shaking, and your lower back is arched and your stomach is about to touch the floor, then there will be no effect.
Now that we have figured out how to properly stand in the elbow plank, let’s decide how many minutes we need to hold it.
Plank options
Let's take a closer look at several basic plank options.
Classical
The ideal option for beginners is the classic one. It is recommended to master it first; it allows you to remember the technique, as well as understand which muscles are involved in the work and how the body reacts to it.
Beginners can do simplified options:
- spread your legs a little wider, but make sure that the load does not transfer to your shoulders and forearms;
- perform on straight arms, not on elbows;
- make approaches shorter in time, but increase their number.
Advanced athletes can try more difficult options:
- perform while standing on your elbows;
- keep your feet together with your heels touching;
- increase the duration of one approach;
- use leg weights;
- do push-ups during breaks.
It is important to select a complex according to your own feelings. Then it will not be perceived as torture, it will be made more comfortable every time.
Side plank
The side plank is performed while standing on one arm. In this case, the lateral abdominal muscles and waist are mainly involved in the work. You need to hold each side for at least 15 seconds.
During execution, you need to ensure that the body is extended in one straight line. There should be no sagging in the pelvic area or severe discomfort in the shoulder joints. It is better for beginners to perform it on straight arms, for advanced ones - on their elbows.
You can complicate the option by using weights for the legs and dumbbells for the arms. It will be very difficult to stay statically in this position.
Planks with limb extension
After the classic version has been mastered, you can move on to complications. To do this, use a bar with an arm extension. People call her “Superman”. The position of the usual exercise is assumed, after which one arm is raised straight in front of you or slightly to the side. The pose is fixed for at least 30 seconds.
You can make the exercise even more difficult by simultaneously tearing off your left arm and right leg. Then vice versa. The exercise works well on the muscles of the back, arms, and abs.
The main thing, as in other options, is to follow the technique, and do not forget that the whole body should be elongated in one line.
Plank exercise: monthly plan for the most stubborn
The second method is for those who were not looking for easy ways. Or he has completely completed the first table of the monthly plank and wants to try something new. We suggest doing not classic plank variations, but performing different exercises daily from these starting positions. There will be fifteen such exercises in total - when the last one is over, start the circle again.
So, plank exercises for 30 days:
- Low on the elbows. The elbows are directly under the shoulders, the body is in a straight line, the feet are close to each other, the buttocks and abs are tense. We do 45 seconds - and so three times.
- Lateral on the elbow. From the starting low plank position, you need to transfer your body weight to your left elbow and turn around. At the same time, the right arm is straightened upward, the gaze is fixed on the raised hand. Do 45 seconds, then change elbows. Ideally, do three approaches for each side.
- High on the arms. The hands are placed directly under the shoulders, the feet are close to each other, the legs are straight, the muscles are all tense. Also – three sets of 45 seconds.
- Side on the arm. From the previous position, you need to turn around and transfer your body weight to your left hand. Straighten the right one forward, while looking at the right hand. Stand like this for 45 seconds, then change sides. And so - six times.
- Low with leg bending. While in a low plank position on your elbows, alternately bend one knee and then the other. Hold for 45 seconds and then do two more sets.
- High with bending arms. The starting position is from exercise number 3. You need to take your hands off the floor one by one and touch the opposite shoulder. Make sure that the body itself does not sway. Repeat three times for 45 seconds.
- Low+high. One of the simplest but most effective plank exercises per month. From the low plank position, you need to straighten your arms one by one, then, in turn, lower yourself onto your elbows. At the same time, make sure that the body remains perpendicular to the floor. By tradition, we do three approaches, each of which is 45 seconds.
- Circular. The movements become more and more dynamic with each new day of the month: the plank pattern we are doing today is a little more complicated than the previous one. You need to start with the lower version, then bend your knees one by one, from this position pull yourself up into a high plank, touch the opposite elbow with each hand and return to the starting position - in a low plank. We also do three times for 45 seconds.
- Triceps push-ups . We make it from a low plank, elbows slightly forward. Slowly lower yourself until your shoulders rest on your elbows and rise back up. So - three times for 45 seconds.
- Low on the elbows + twist. We get into a low plank position, then turn our hips to the left - until about 10 cm remains to the floor. Then we repeat the movement to the right. We do three traditional approaches of 45 seconds.
- High with jumping. We get to the starting position, then jump and spread our legs shoulder-width apart. The buttocks should not rise at the same time. Then - back to the original one. Repeat for a minute, doing three approaches.
- Low with a deflection. We stand in a low plank position at the starting position and turn onto our right side. Then you need to raise your hips, freeze for a couple of seconds in this position, and then lower them almost to the floor. That is, move your hips first up, then down. Perform for a minute, then take a break and repeat two more times. By the way, a life hack for girls: a month of backbend planks is an excellent way to pump up your oblique abdominal muscles.
- High with knees pulled up. We get up to the starting position, pull the left knee towards the right elbow, hold the position for a couple of seconds, put the leg back. And then vice versa. Do it for a minute – three times.
- Low with knees pulled up. In this case, the leg must be pulled to the elbow of the same name - across the side. Hold this position for two seconds, return to the starting position and repeat with the other leg. We do three repetitions for a minute.
- High stretched. The last exercise in our “table” is the plank for 30 days. Starting position: high plank position. We stretch our arms forward as much as possible, tighten our stomach, and strain our buttocks. We stand in this position for 45 seconds, repeat three times.
So, we told you how to do the plank exercise, we also provided a photo and a diagram for the month. Then everything depends only on you! Try it and share your results in the comments!
Program “30 days around the bar”
You can find many different programs on the Internet. The most popular of them is “30 days around the bar.” Its main condition is to challenge yourself and practice every day, increasing the time, no matter what. This plan lasts 30 days and looks like this:
| Day | Time in seconds | Day | Time in seconds |
| 1 | 10 | 16 | 120 |
| 2 | 10 | 17 | 120 |
| 3 | 20 | 18 | 120 |
| 4 | 20 | 19 | 150 |
| 5 | 30 | 20 | 150 |
| 6 | 30 | 21 | 150 |
| 7 | 40 | 22 | 180 |
| 8 | 40 | 23 | 180 |
| 9 | 50 | 24 | 210 |
| 10 | 50 | 25 | 210 |
| 11 | 50 | 26 | 240 |
| 12 | 60 | 27 | 240 |
| 13 | 60 | 28 | 270 |
| 14 | 90 | 29 | 270 |
| 15 | 90 | 30 | 300 |
This program will help the body adapt and get used to a new type of load.
Weight loss plank for beginners, table
A monthly program for beginners might look like this:
| Day | Time in seconds | Day | Time in seconds |
| 1 | 20 | 16 | rest |
| 2 | 25 | 17 | 60 |
| 3 | 25 | 18 | 65 |
| 4 | 30 | 19 | 70 |
| 5 | 30 | 20 | 65 |
| 6 | 35 | 21 | 70 |
| 7 | 35 | 22 | 80 |
| 8 | rest | 23 | 80 |
| 9 | 35 | 24 | rest |
| 10 | 40 | 25 | 90 |
| 11 | 40 | 26 | 90 |
| 12 | 45 | 27 | 95 |
| 13 | 50 | 28 | 95 |
| 14 | 50 | 29 | 100 |
| 15 | 60 | 30 | 100 |
The proposed program can be modified to suit you, adding 5-10 seconds daily.