In Indian culture, a lot of attention is paid to taking care of the body. Yoga is a whole science of the body that has no analogues in other cultures and strengthens a person both spiritually and physically. This is not just physical education, these are deeply thought-out exercises that allow you to achieve the ideal as quickly and efficiently as possible. Yoga for losing belly fat, strengthening muscles and relieving stress is now popular all over the world.
A separate advantage is that to practice yoga you do not need to go to the gym or buy equipment for your home. Take a mat that will soften the hardness of the floor a bit, choose a spot and get started.
Return to content
Is it possible to lose weight with yoga?
People who have been practicing yoga for a long time stand out from the crowd. They are slim, fit and especially fresh. It is enough to practice regularly for several weeks to start receiving compliments from others. Yoga makes all organs of the human body work better, triggering not only weight loss, but also improved well-being:
- Blood pressure and heart function are normalized;
- Sleep improves;
- Metabolism accelerates;
- Increases brain efficiency;
- Appetite decreases;
- The tendency to edema disappears;
- Muscles are strengthened;
- Energy and vigor appear.
Return to content
Contraindications
Hatha yoga requires concentration, stamina and strength. The loads here are not at all the same as those of athletes or wrestlers, but they are there, and not small. Therefore, such activities also have contraindications:
- Serious diseases of the nervous system;
- Period of exacerbation of any diseases of internal organs;
- Pneumonia;
- Tuberculosis;
- Heart diseases;
- Any stage of cancer;
- Damage to the spine or joints.
If you decide to start practicing yoga, be sure to consult your doctor and make sure you are not putting your health at risk.
Yoga helps to cope with many ailments, but it can only be practiced during periods when there are no exacerbations and the condition is stable.
Return to content
Rules for performing yoga for losing weight on the stomach and sides
Since yoga is a science and not just burning fat, it has many rules and nuances. To get the maximum result, you should adhere to them.
- Don't overload yourself. Get used to the exercises gradually. Start with a few minutes a day and gradually increase the load.
- Always exercise on a mat, not the floor.
- Set a routine and follow it strictly. Don't miss classes unless your health requires it.
- Exercise outdoors or in a well-ventilated area.
- Each exercise should be repeated 3-4 times during a workout.
- Start your session with a short warm-up to prepare your body.
- It is best to practice in the morning on an empty stomach. If this is not possible, let at least 2 hours pass after eating.
- Don't ask yourself whether the results of your training are visible in the first 4 weeks. It is there, but it grows gradually and this can only knock down your determination. After 4 weeks you won’t recognize yourself, but in the meantime, be patient.
- Try to eat healthy. More fresh vegetables and fruits rich in fiber, less sweets and smoked foods.
- Drink water. This is an inevitable rule of good health: at least 1.5 liters of water per day to prevent dehydration.
Yoga includes a huge number of asanas, each of which has its own purpose. Here are those that will help make your figure slim:
- Dog pose;
- Half Moon Pose;
- Rest pose;
- Camel Pose;
- Boat Pose;
- Half a boat;
- Cobra pose;
- Warrior pose;
- Tilt towards the feet
These are the yoga poses for losing weight on the stomach and sides, and we will dwell on them in more detail.
Return to content
Effective exercises for the abdomen and sides
If you want to lose weight and consider the abdomen and sides to be the most problematic area, include the following asanas in your daily practice.
Important! Be sure to read the contraindications for asanas! Do not try to master the pose right away, so that this does not lead to injuries and difficulties in practice.
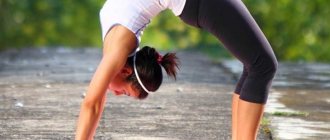
Uttanasana (tilt towards the feet)
The asana tones the abdominal muscles and helps tighten them. As a result of regular practice, the sides become smaller. If flexibility does not allow you to fully perform the asana, master it gradually, going lower and lower, stretching more and more.
Contraindications. Back injuries, high and low blood pressure.
Sarvangasana
Almost everyone has been familiar with this asana since school. This is “Birch”, which has a beneficial effect on the abdominal muscles and the entire digestive system. It heals the entire body.
Contraindications. Hyperthyroidism, high blood pressure, thrombosis, neck and spine injuries, prolapsed disc, menstruation. During pregnancy, perform under the supervision of an instructor.
Paripurna Navasana (boat pose)
The exercise strengthens all areas of the abs, thighs, and also has a beneficial effect on the back muscles.
Contraindications. Pregnancy, menstruation, diarrhea, exacerbation of intestinal diseases, inguinal hernia, hernia of the spine, food opening, diaphragm, acute pain in the lumbar region, postoperative period, appendicitis, arterial hypertension.
A few more exercises that help burn belly fat and strengthen muscles.
Bhujangasana (cobra pose)
The asana has many positive effects, including stimulating the abdominal organs, relieving stress and fatigue.
Contraindications. Back injuries, headache, pregnancy, carpal tunnel syndrome.
Dhanurasana (bow pose)
This asana massages almost all abdominal organs, including the liver, gall bladder, stomach, and pancreas. It is effective in reducing excess fat on the stomach and thighs. Strengthens the abs, buttocks, hips, lower back and back.
Contraindications. Hypertension, stomach ulcers, colitis, diseases of the cardiovascular system, hernia and displacement of intervertebral discs, as well as pregnancy.
Camel Pose
Ushtrasana is a pose that helps strengthen the torso muscles. With regular practice, it makes the spine flexible and strengthens the respiratory organs. It is often recommended for people prone to colds or with weak lungs.
Lay down a small rug. Sit on your knees, hands on your hips. From this position, lift your pelvis while continuing to lean on your knees. Arch your back, stretch your head and hands toward your heels.
If you have just started doing yoga and find it difficult, you can place your hands behind your back one at a time. When executed perfectly, they move in parallel.
Return to content
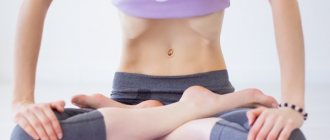
Yoga for a Flat Stomach: 5 Simple Poses to Help You Get Back Slim
Yoga for the stomach, 5 simple poses that will help you regain your slim figure.
Belly fat is common even in thin people, and it can be very difficult to get rid of. Not only is a bulging belly immediately visible and it brings a lot of mental suffering. It also affects your overall health. Belly fat can lead to type 2 diabetes, heart problems and cancer, so it is important to get rid of it.
Yoga is a very effective way to cope with this problem, as anyone who has done it at least a little will confirm. Of course, exercise alone cannot solve everything: doing yoga will help you visually reduce your belly fat, but 70% of success depends on proper nutrition.
Cobra Pose (Bhujangasana)
This pose not only helps to reduce belly fat, but also strengthens the abdominal muscles.
The exercise overall strengthens your upper torso and makes your back stronger and more flexible.
Lie on your stomach, stretch your legs and rest on your palms (they should be located directly under your shoulders).
Your chin and toes should touch the floor.
Inhaling slowly, raise your body on your arms. Arch your back as far as you can.
Depending on how you feel, hold this position for 15–30 seconds.
Exhaling slowly, return to the starting position.
Repeat the exercise five times with short breaks of 15 seconds.
Bow Pose (Dhanurasana)
Lie on your stomach, bend your knees, lift your shins up, place your hands behind your back and grab the outside of your ankles.
Inhale, and exhale, bend as much as possible, lifting your pelvis and chest from the floor. The head should be moved back as far as possible.
Try to hold this pose for 15-30 seconds and watch your breathing.
As you exhale, return to the starting position, stretching your arms and legs.
Repeat the exercise five times with 15-second breaks.
Boat Pose (Naukasana)
A wonderful pose to remove fat from the waist. In addition, it has a beneficial effect on appetite and strengthens leg muscles.
Lie on your back, stretch your legs, place your hands next to your body, palms up.
Inhale and slowly lift your legs, try to keep them straight and do not bend your knees.
Point your toes and try to raise your legs as high as possible.
Stretch your arms and try to reach your toes; keep your body at a 45 degree angle.
Breathe evenly and hold the position for 15 seconds.
Exhale deeply.
Repeat the exercise five times with breaks of 15 seconds.
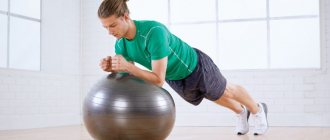
Plank (Kumbhakasana)
Get on your knees, place your hands in front of you.
Walk your legs back and rise on your toes, as if you were doing a push-up; raise yourself up on your hands.
Take a deep breath, stretch your neck and look straight ahead; your back should be straight, you will feel a slight tension in the abdominal area.
From head to toe, your body should be like a straight line.
Hold this position for 15 to 30 seconds; If you feel strong, try to do this for as long as possible.
Repeat five times with short breaks.
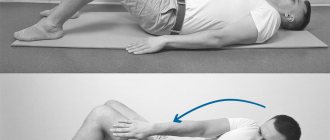
Wind Release Pose (Pavanamuktasana)
In addition to the fact that this asana reduces lower back pain and strengthens the abdominal and hip areas, it has many more benefits. For example, the wind release pose improves intestinal function, normalizes acidity levels, and speeds up metabolism.
Lie on your back, stretch your legs, stretch your arms parallel.
Stretch your legs, keeping your heels together.
As you exhale, bend your knees and slowly lift them towards your chest.
To maintain the correct position, clasp your knees with your hands.
Breathe deeply and hold this pose for 1–1.5 minutes.
As you exhale, lower your legs and arms to the floor.
Repeat this exercise five times with breaks.
If you want to speed up your metabolism, we recommend performing this set of exercises in the morning. And to quickly achieve results, repeat these poses three days a week, three to five times a day.
These 5 simple poses will help restore your slimness and confidence.
I love yoga and know quite a lot about it, but recently I met yoga instructor Nadezhda Andreeva and she simply changed my idea of yoga.
If you want to
- get rid of chronic back pain, headaches and muscle pain
- stretch and strengthen your back muscles
- normalize blood pressure and get rid of digestive problems
- make your body stronger, more resilient and flexible
- always maintain good health, increase energy levels in the body and get rid of stress
- improve the functioning of the respiratory system
I recommend you, free lessons of Hope, which you can get here
Boat pose
Paripurna Navasana perfectly loads the abdominal and leg muscles.
Sit on the mat with your legs straight in front of you. Lean your torso back while raising your legs. Balance with your heels and head at the same height. Your arms should be extended forward.
Beginners can make the task easier by raising their legs slightly bent. However, you need to strive to improve stretching and perform the asana fully.
Pros perform the exercise by spreading their arms to the sides, increasing the load on the abdominal muscles.
Return to content
Firmer legs and thighs with yoga
Any woman tries not only to reduce volume in the hips, but also to fight problems on the inner thighs, which without development very quickly become flabby, cellulite or “ears” appear. The following yoga asanas will solve such problems by making your thighs toned and elastic.
Chair Pose
An asana that actively works the muscles of the buttocks and legs, actively stretches the back muscles:
- Place your feet side by side.
- As you inhale, raise your arms up and fold your palms.
- As you exhale, begin to slowly squat. You must remind yourself of a spring that has contracted.
- Slowly stretches out to return to its previous position.
There is no need to bring yourself to shaking legs - you can do the exercise in 30 seconds, 3 approaches. So it greatly contributes to the formation of a beautiful hip line and burning calories.
In yoga, the main thing is to work on relaxation. When you can breathe evenly for a minute while performing an exercise, it means that your muscles are already becoming more plastic and pliable, and you will soon see the result!
Bridge Pose
Ideal to perform after Chair Pose:
- Lie down on the floor and relax.
- Bend your knees and place your feet next to your pelvis.
- As you exhale, lift your pelvis off the floor so that your knees form a 90-degree angle. The buttocks should be pulled in, as well as the abdominal muscles, and the arms and neck should not be tense; the shoulders and head hold the “structure.”
- Hold the position for a minute.
- Lower your hips to the floor, and then your legs.
Downward Facing Dog pose with variable element
Very often, asanas are supplemented or complicated. This is just a more complicated version of the “dog”, since the work of the leg muscles is activated here:
- Form a “triangle” with your body, taking the “downward-facing dog” pose: as you exhale, on one side you lean on your hands (and not only your palms are a support, but also your fingers), on the other hand, on your toes.
- After fixing the position as you exhale, lift first one leg, then the other. Hold each leg lift for at least 15 seconds.
Warrior Pose
The asana has many interpretations. The next one “pumps up” the whole body and also works on the waist as much as possible:
- Stand straight and make a maximum lunge on your right leg. At the same time, both legs should be stable - you should feel the feet and toes.
- Once you realize that you are standing straight, fix the position and, as you exhale, raise your arms up, folding your palms.
- Stretch up - the stomach should be pulled in, the muscles should be tense.
- When exiting the asana, lower your arms, straighten your supporting leg and return to the starting position.
Goddess pose
Maximum work on the beauty of your thighs and burning fat in this area:
- Spread your legs so that your thighs are parallel to the floor and your knees are directly above your ankles.
- Your arms should be bent at the elbows 90 degrees, and your palms should be open and pointing upward.
- Fix the position and feel that the tension from your legs is distributed throughout your body, your stomach is pulled in.
- Stay in the pose for 30 seconds to a minute, then straighten your legs and bring them together.
Pose "Eagle Warrior 3"
To perform the exercise you will need stability in your legs and feet. The pose works well on the muscles of the legs and thighs. Therefore, if you are a beginner yogi, then after gaining strength in your feet and toes, you need to master this exercise, as it is an excellent fat burner:
- Standing on the mat, lean forward, forming an angle of 90 degrees.
- Weave your hands into a “rope” together.
- Slowly lift one leg first and fix the position for at least 15 seconds, then the other leg with fixation.
- Give yourself a rest for 5 seconds and repeat the exercises 2 more times.
In addition, you can use a diet to lose weight on your legs, as well as perform strength exercises. Such an integrated approach will help to quickly achieve slender women's legs.
Half a boat
Ardha Navasana is a variation of the previous asana.
When performing it, you also tilt your body from a sitting position and raise your legs, balancing on your buttocks. But in this asana, the hands should be behind the head, which slightly changes the load. The legs are raised approximately forty degrees relative to the floor.
Return to content
Dog pose
Adho Mukha Svanasana helps strengthen the muscles of the legs and abs.
Get on all fours with your back straight. As you exhale, straighten your legs, resting on your palms and feet.
Beginners can stop here. Pros perform back bends.
Then you should exit the pose correctly. Place your feet close to your hands and straighten up, inhaling and raising your arms up. Lower them and exhale.
To lose weight, you can drink apple or wine vinegar, which have a burning effect on fats in the human body -.
You can arrange a fasting day on cottage cheese for weight loss. This diet also helps you lose weight. Most importantly, it does not exhaust the body by starvation.
Here we describe a diet option for losing weight by 10 kg. Among them is the buckwheat diet.
Return to content
Skinny like a yogi
Neither at the dawn of its birth, nor for many hundreds of years after, yoga was ever positioned as a means of losing weight. However, times are changing and today yoga centers are flooded with numerous people who want to lose those hated extra pounds.
Suddenly it turned out that Eastern practice, aimed at the harmonious development of the personality, improving it spiritually and physically, leads to harmony.
The secret to losing weight while doing yoga lies not in counting calories and sharply limiting yourself in food, but in performing sets of exercises (in fact, these are various poses, or otherwise asanas).
For more information on how yoga helps you lose weight, read my article “How to lose weight with yoga”
Operating principle
Yoga tries to normalize your body. All her asanas are aimed at ensuring that your internal organs work correctly; they stimulate the functioning of the digestive, cardiovascular, hormonal, and nervous systems.
This integrated approach helps life support systems establish harmonious interaction with each other, from which the metabolic process is already established and, as a result, the loss of extra pounds. The body itself comes to its natural weight.
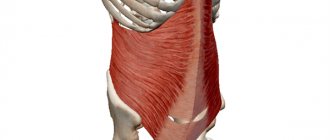
Yoga asanas affect certain parts of the body and can not only increase its elasticity, but also have a therapeutic effect.
There are a huge number of them, each has its own name, sometimes when translated they sound quite funny, but they reflect the essence of a particular pose.
For example, one of the most famous
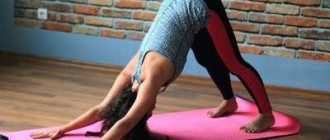
Adho Mukha Svanasana
Translated as “Downward Facing Dog,” which fully reflects the essence of the pose itself, doesn’t it?
It is believed that it promotes a rush of blood to the head, improves complexion, helps with pain in the lower back and shoulder joints, flat feet, digestive disorders (helps get rid of constipation, excess bile), hormonal imbalance, and excess weight.
By the way, you should not do it if you have high blood pressure, headache or diarrhea. In general, it is worth noting that performing almost any yoga poses should be combined with consultations with specialists - yoga trainers.
If we talk about fitness, then it is recommended to perform this pose if you want to make a beautiful butt (girls, how do you like this method?).
Cobra pose
Bhujangasana works on the stabilizing muscles of the torso and abs, affects posture and waist. It makes the spine more flexible and has a beneficial effect on the organs of the digestive system.
Lie face down on the mat, place your hands on your palms at chest level. Elbows pressed to the body.
Smoothly straighten your arms, arching your back and without lifting your hips from the floor.
In this position, the stomach should be pulled in and the shoulders should be apart.
Slowly return to the first position, tensing your buttocks and legs.
Return to content
Poses for a flat stomach
Yoga exercises for losing weight in the abdomen and sides involve taking certain poses - asanas, which must be performed strictly while holding the inhalation
. Thus, the diaphragm is used in the breathing process. When you inhale (through the nose), the stomach inflates, when you exhale (through the mouth), it retracts.
Important
so that the chest remains motionless.
Once your breathing technique is perfected, begin the exercises. Pay attention to their names and main functions:
- Adho Mukha Svanasana strengthens the muscles of the legs and abs, making the stomach flat;
- Bhujangasana works on the torso and abdominal muscles, emphasizing posture and waist, and has a beneficial effect on the functioning of the digestive tract;
- Dhanurasana, like the previous one, improves digestion and strengthens the central part of the abdomen;
- Virabhadrasana 1 strengthens the legs, tightens the sides and defines the waist;
- Paripurna Navasana fights waist fat and improves appetite;
- Kumbhakasana is the most effective and simplest yoga pose that affects almost the entire muscle group. It strengthens and tones the shoulders, arms, back, buttocks, and tightens the stomach;
- Pavanamuktasana strengthens the abdominal muscles and speeds up metabolism;
- Ardha Chandrasana is responsible for the abdominal muscles and removes excess fat from the sides.
Performing these poses and following all the rules will help in the fight against excess weight, keep muscles toned, correct a beautiful figure and improve health. The main thing is not to be lazy and remain persistent, then you will definitely succeed.
Warrior Pose
Virabhadrasana specializes in the muscles of the back and waist, and also strengthens the legs. There are two varieties of this asana.
- Virabhadrasana 1. Stand straight on the mat with your feet wide apart. Place your palms together above your head. Then bend one knee while keeping your weight on that leg. Turn your body in the direction of travel. Stay in this position for a while, then straighten up.
- Virabhadrasana 2. Stand on the mat with your feet wide apart. One leg is straight, the other is bent at a right angle. Turn your head in the direction of the tilt, spread your arms to the sides, parallel to the ground. Stand in this position for a minute, pulling in your stomach and straightening your back.
In both types, this asana must be performed twice - bending the legs in turn.
Pros perform Virabhadrasana, leaning on one leg, raising the other to the chest, then moving the leg back and bending the torso forward. Your arms can be extended to the sides, or pressed against your body. This makes the muscles work more intensely and improves balance.
Return to content
Marjariasana (Cat Pose)
In addition to reducing belly fat, this pose increases the flexibility of the spine.
How to do
Sit in Vajrasana. Breathe evenly and, as you rise from this position, allow your body to stand parallel to the floor so that your body rests on your knees and palms. Your knees should be placed under your hips and your palms should be under your shoulders, facing the floor. Keep your head straight. Stand so that your weight is distributed evenly.
Inhaling deeply, lift your head, stretching your back down so that your body becomes concave. Hold your breath and maintain your posture for approximately 15 to 30 seconds. Exhale deeply and lower your head while arching your back upward. Keep your buttocks and abdomen tense as you contract. The head should be between the hands. Breathing deeply, hold the pose for approximately 15 to 30 seconds, gradually increasing the time you hold the pose to 90 seconds. Exhale and slowly return to Vajrasana. Rest for 15 seconds. Repeat this asana 10 times, gradually work up to 30 times. Rest 15 seconds after each repetition.
Benefit
Increases the strength of the spinal column. Helps correct posture. Relieves tension in the lower back.
Contraindications.
If you suffer from a traumatic brain injury, make sure you keep your head level with your torso when performing this pose.
Rest pose
Savasana is the ideal asana to end your workout. Lie on your back on the mat and thoughtfully relax every muscle in your body. Lie like this for a few minutes.
This set of exercises should be performed every day, preferably twice a day. After the first visits, it may seem that this is not reflected in anything. But after a few weeks of regular training, you will begin to notice how your body is transformed. Pleasant music and slow flowing asanas for weight loss will allow you to get your figure into the desired shape without stress.
Return to content
Yoga exercises and poses for weight loss
Yoga does not burn fat like running. It acts by accelerating the metabolism, slowly and delicately. You need to perform asanas correctly and practice breathing exercises, which are also given great attention in Indian culture.
There is a special word for breathing - pranayama. The main thing in the art of breathing correctly is to do it deeply and use all the capacity of the lungs. Here's how to learn it:
- Take a comfortable position on the mat. You can lie on your back or sit with your back straight.
- Pull your stomach in and tighten your abdominal muscles.
- Push the air out of the bottom of your lungs using your abdominal muscles and diaphragm.
- Relax your stomach.
- Slowly inhale as much air as possible. First, the stomach inflates, then the chest expands, then a little more air is placed under the collarbones.
- Hold your breath.
- Exhale, emptying your lungs first in the area of the collarbones, then the ribs, then the abdomen. Exhale all the air to the maximum.
- Hold your breath.
- Inhale again according to the described pattern.
Pranayama is an important component of yoga for the waist and abdomen. After all, all these muscles must get used to participating in the breathing process and work constantly.
Do these exercises as often as possible. When you perform asanas or go about your business, always try to breathe this way. At first it is strange, then you get used to it and it becomes the most comfortable way of breathing. Because it is most beneficial for the body to breathe this way.
Having learned to breathe, we move on to asanas that will help you become slimmer. Don't forget about the pranayama skills you just learned.
Return to content
Yoga for losing belly fat - proper breathing
1. Take a slow, deep breath. Inhale through your nose, concentrating on filling your lungs with air, as if you were filling a container with water. Expand your chest and focus on filling all available space with air.
- When you inhale, the diaphragm moves downwards, which naturally causes the abdomen to protrude. However, often people do not want to protrude their stomach and keep it tense, and because of this they cannot take a full breath.
- When you inhale, physically push out your belly to fill your lungs with air. After some practice, this will become a habit and you will find yourself breathing naturally from your belly.
- Breathe slowly, evenly and gradually filling your lungs with air.
2. Take a deep breath. Exhaling correctly is often more difficult. Because when you get close to the end of your exhalation, you become too focused on inhaling again faster, rather than emptying your lungs completely of air. When you exhale, you must exhale completely. Train yourself to pause for a moment before taking another deep breath. To do this, you need to overcome your natural desire to inhale as soon as you finish exhaling.
To exhale correctly, change the inhalation process. Think about first exhaling air from your chest and then drawing in your stomach, as if you were pouring water from a vessel. As you exhale, pull your stomach in as if you were squeezing out air.
3. Strengthen your core muscles. The diaphragm is part of the core muscle group and also plays a major role in the breathing process. When you actively work your diaphragm while breathing deeply, you also strengthen all of your core abdominal muscles. If you engage your diaphragm by actively moving your belly as you inhale and exhale, you will soon see results.
If you engage your diaphragm, your chest and belly will rise as you inhale and fall as you exhale. You can practice proper breathing by lying on your back with your knees bent. Place your hand on your stomach and watch your stomach rise and fall as you inhale and exhale. Once you have mastered proper breathing while lying down, try doing the same while standing. Also try to pause during the day and observe the breathing process, returning to proper breathing.
4. Practice pranayama yoga. Pranayama is the practice of breathing control. Adding breathing techniques and pranayama to your regular yoga practice will strengthen your inner core muscles. One common practice of pranayama is known as "ocean breathing" or "ujjayi" because it makes the sound of the breath sound like the sound of the sea.
To practice ocean breathing, sit in a comfortable position and focus on your breathing. Inhale slowly through your nose. As you exhale, open your mouth and allow the air to slowly come out with a “ha” sound. When you have mastered exhaling through your mouth, exhale through your nose, but with the same hissing sound, similar to the sound of the sea. Inhale and exhale through your nose, slightly closing your glottis to sound your breath.
You can also try alternative breathing, which balances all the forces in the body. To do this, sit comfortably, clench your right hand into a fist, and extend your thumb and ring finger. Close your right nostril with your thumb and inhale through your left nostril, then release your right nostril and close your left nostril with your ring finger and exhale through your right nostril. Then inhale through the right, release the left nostril and close the right. And so on in a circle, breathe alternately from one nostril to the other.
Another pranayama that is most effective for losing belly fat is kumbhaka or holding your breath. I will talk about this at the end of the article, since this is the most important part of breathing practice in yoga.
5. Understand the importance of proper breathing in yoga practice. In many ways, learning how to breathe correctly is more important than learning how to hold difficult poses. This is especially true when it comes to yoga for belly fat loss. Once you get the hang of breathing, you'll be able to hold poses longer and go further in them than you can imagine now. Typically, you need to exhale deeply to tilt your body forward and increase the depth of the tilt. And when we lift and open our chest, we have the desire to take a deep breath. Exhaling while twisting allows you to expel more air and twist harder.
During your workout, watch your breathing and make sure you don't hold your breath, especially in difficult poses. Walk into the asana as far as you can while maintaining deep breathing. Breathing is closely related to the nervous system, so you can balance the nervous system by breathing deeply, calmly and evenly.
Vasisthasana
Lie on your side with your torso and legs extended in one line. Place your lower arm at your shoulder and straighten it, raising your body straight with emphasis on one foot. The hips also come off. The top arm should be extended upward.
Freeze in this position, then lower yourself onto the mat and repeat on the other side.
Pros can make the asana more difficult by lifting the top leg while holding the foot with the hand.
This asana intensively strengthens stabilizer muscles and has a beneficial effect on the functioning of internal organs.
Return to content
Five most effective asanas for core training
Straight arm plank
Benefit:
strengthens the muscles of the arms and legs, back and abdominals, and also tones the abdominal organs.
Technique:
- Lie on your stomach.
- Place your palms on the sides of your body at chest level.
- With your toes and palms of your hands on the floor, lift your body and keep your legs straight.
- Look down in front of you, do not pinch your cervical spine.
- Maintain a straight line from your heels to the top of your head.
- Hold the final position for several breathing cycles, each time increasing the time spent in the asana.
- Get down to the floor.
Variation:
The asana can be performed on bent elbows - place them shoulder-width apart, parallel to each other.
Complication:
lift your arms/legs alternately, holding the position.
Photo: istockphoto.com
Downward facing dog
Benefit:
stretches the back surface of the legs, elongates the spine, gives a flow of fresh blood to the head - in this case, brain cells are renewed and the complexion improves. The pose also opens the chest, which ensures good posture and removes tension in the neck.
Technique:
- Lie on your stomach, the distance between your feet is about 30 cm.
- Place your palms at chest level, elbows next to your body.
- Exhale and push your pelvis up, lift your body off the floor, and press your arms fully straight into the mat.
- Palms pressed firmly to the mat, fingers spread wide, middle finger pointing forward, neck relaxed, head down between your hands.
- Beginners should bend their knees, but if the back surface is well stretched, leave the legs straight, and press the feet firmly to the mat, without lifting the heels off the floor.
- Stay in the asana for a minute, keep your breathing even, deep and calm.
- When finished, exhale, raise your head, roll into a plank position with straight arms, gently lie down on the mat and rest.
Complication:
From downward-facing dog, lift your right leg up, then pull the knee of your right leg towards your right elbow and return it back. Then pull crosswise to your left elbow, return your leg to the mat, change legs. Gradually increase the duration of the “freeze”.
Photo: istockphoto.com
Balances in table pose
Benefit:
strengthening the back and abdominal muscles, improving coordination.
Technique:
- Get on all fours: place your hands under your shoulders, and your legs hip-width apart, tuck your stomach - this will straighten your back.
- Extend your right arm forward and your left leg back, with your toes pointing straight toward the floor, and hold the balance for several breaths.
- Switch sides.
- Align your pelvis and back - it is important not to sag in the lower back.
Types of yoga: how to choose what suits you
4 rules of yoga for a healthy body
Side plank
Benefit:
strengthens the oblique muscles of the abdomen, arms, legs and wrists, strengthens and stabilizes the shoulder girdle, tones the lumbar and sacral spine, and forms a beautiful waist.
Technique:
- Starting position – plank with straight arms.
- Shift your body weight to your right hand and roll onto the outside of your right foot.
- Place your left foot on top of your right.
- Raise your left hand straight up.
- Push your hips up, creating a kind of arc.
- If it is difficult to fix this position, then lower your right knee to the floor.
- Record several breathing cycles, increasing the time.
- Repeat the pose on the other side.
Complication:
From the side plank, lift your left leg, bend your knee and grab your left big toe with your left hand. Balance in this pose for some time. Then release the leg grip. Come out of the asana.
Photo: istockphoto.com
Bhujangasana
The starting position is the same as in Shalabhasana, but place your hands on the floor. As you inhale, straighten your arms, lifting your body. At the same time, the hips lie, the back bends.
This asana develops flexibility of the spine, strengthens the muscles of the arms, abs and back.
Perform asanas in a complex manner, without haste, to pleasant music. Do a couple of sets every day and don't allow yourself to take breaks. Yoga for the abs and waist is one of the most effective ways to achieve your desired goal. But only subject to discipline and regular exercise.
Return to content
Exercise technique
In order to increase the effectiveness of the exercises performed, it is recommended to follow some rules. So, just a few weeks after starting classes, you will see the first results, which will be a good incentive to increase your loads.
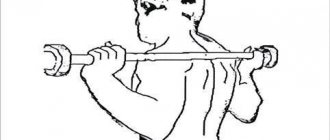
- Warm up. Place your feet shoulder-width apart and stretch to the right and left sides, thereby warming up the lateral muscles of the core. Bend forward, left and right several times, touching your fingertips to the floor, which will stretch the inner thigh muscles, calves, and transverse abdominal muscles. Finish your warm-up with slow twists and head circles.
- Breath. During the exercises, it is recommended to adhere to one breathing cycle “inhale-exhale”. The exercise is performed while inhaling, while in each position, hold your breath for several counts, and at the same time, try to tense your abdominal muscles as much as possible. As you exhale, slowly come out of the indicated pose and proceed to the next exercise.
- Cyclicality. It is recommended to perform each exercise 3-5 times for maximum development of a specific muscle group. After completing the entire set of exercises, it is important to repeat the cycle in order to consolidate the result. So, you will spend no more than 15 minutes on one cycle, which must be repeated daily.
Yoga instructors recommend combining exercises for a flat stomach with cardio training - walking, running or aerobics. If yoga exercises are aimed at training muscles and tightening the skin, then cardio training will only help speed up the process of burning fat from the abdominal area. To avoid overload, it is advisable to alternate workouts. For example, today you do yoga, and tomorrow you go for a run at the local stadium.