The beauty of the body, ideal shape, is not only strength and endurance. Plasticity plays an important role in creating your own figure. One of the truly revealing exercises that demonstrates good stretching and flexibility is the bridge. This is a kind of plastic test, which not even every athlete who regularly works out in the gym can pass from the start.
Few people imagine how to stand on a bridge, what exercises need to be performed in order to develop the necessary plasticity and harmoniously develop their body. Even if the task seems impossible to you for now, after simple hard training, doing a stand is quite possible for everyone. This way you can significantly develop the flexibility of the spine and the quality of the muscle corset that supports it.
Rules for performing the exercise
Ideally correct execution of the bridge exercise is possible with good flexibility and a sufficient level of preparedness. So, the main points of this design of the bridge:
- Arched back. No matter how much it hurts the ears or eyes of experienced strength athletes, in the context of flexibility exercises, it is the maximum convexity and concavity that are indicators of progress;
- The head and shoulders should be lowered below the line of the buttocks, which again characterizes the level of plasticity;
- Limbs clearly fixed on the floor - palms and feet should not come off the floor, they should not be held on the surface by force, the body position should be as comfortable as possible;
- Your palms should be shoulder-width apart from your feet. Of course, such a result cannot be achieved in a week, but if you set a goal and practice regularly, then nothing is impossible;
- Body weight is evenly distributed between the legs, back and arms. You cannot support yourself using only your back - this can lead to injuries, pain, and it also looks ugly;
- Measured breathing without delays.
Preparatory exercises
Attempting to make a bridge without proper preparation can end not only in failure, but also in injury. When performing this stance, sufficient flexibility of the spine, strength of certain muscle groups and coordination of movements are required. Therefore, it is necessary to master the stance gradually, systematically performing special exercises, moving from simple to complex.
Let's look at the lead-up exercises to get on the bridge. Include them in your training program, and you will be able to master even the most difficult version of this stance.
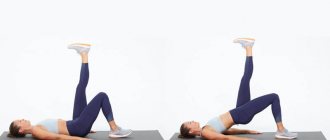
Gluteal bridge
This simple exercise will help strengthen the muscles of the legs, lower back and buttocks.
Lying on your back, you need to place your legs bent at the knees slightly wider than your shoulders. Hands lie relaxed on the floor. Raise your pelvis as high as possible, arching your lower back and squeezing your buttocks. At the same time, lean on your feet and shoulders, do not lift your head off the floor, your neck must be relaxed, otherwise injuries are possible. At the top point, hold for 1-2 seconds and lower your pelvis. Gradually increase the number of repetitions and approaches. When you can do 3 sets of 15-20 times, move on to the next stage of the training process.
Reverse plank
This exercise strengthens the muscles of the arms, back, and abs. It is performed from a sitting position.
Legs lie on the floor, straightened and spread slightly wider than shoulders. The palms rest on the floor slightly behind the body. Raise your pelvis and align your torso and legs in a straight line. At the same time, do not bend your neck, do not lower your head, look ahead. If you can’t get into this position, you can initially bend your knees a little. Stay in this pose for a few seconds. Achieve 3 sets of 10-15 reps.
Bridge with support
After practicing the two previous exercises, you will sufficiently strengthen the necessary muscle groups, and you can try to stand in a bridge from a support. A fitball is suitable as a support; in the absence of one, you can use an ottoman or a low bench.
Sit on the floor with your back to the support, then, leaning on your feet and palms, move your middle back onto the support. Place your hands behind your head and place your palms on the floor, fingers pointing towards your shoulders. Legs bent at the knees are spread slightly wider than shoulders. The neck is relaxed, the head is down. Extend your arms and legs at the same time, lifting yourself off the support and bending. Try to straighten your arms and legs as much as possible and stay in this position.
When this stance is already easy to achieve, you can already master the bridge exercise from a lying position.
How to make a bridge correctly, beautifully and plastically
The main rule when performing a gymnastic bridge is the smoothness and clarity of movements. There is no need to make sudden movements, try to jerk down below the usual level or forcefully “fold”, pulling your legs towards your head. All these points can lead to injury or damage, pain.
The regularity and ease of movements during the execution of the bridge show not only the level of mastery of the technique, but also developed flexibility, a sense of balance, and impart additional elegance and aesthetics.
Making a bridge correctly is not difficult; the ideal execution technique is described above. To perform beautifully, you just need to add smoothness and slowness, as well as fixation in the final position.
Benefits of exercise
The seemingly simple bridge exercise has many positive aspects for health and appearance:
For the most part, our daily activities involve sitting at a workplace, driving, cooking, cleaning, and so on - all these moments are associated with rounding of the spine, leading to the appearance of a stooped back and shoulders, which does not look very aesthetically pleasing. Performing a bridge allows the muscles to bend in the opposite direction, warm up, eliminate problems with intervertebral discs due to weak blood flow in this area, and also restore beautiful posture and straight shoulders;
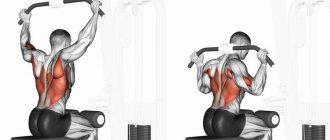
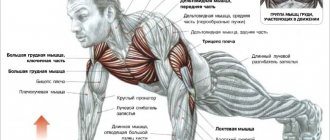
- The bridge trains many muscles. First of all, the deep back muscles are trained - the rectifiers, the so-called columns. They serve as the main and support for the spine. In addition to them, the gluteal muscles, hamstrings, and muscles of the upper body (shoulders and arms) are used to varying degrees.
- Performing this exercise allows you to stretch almost the entire body at one time - quadriceps, abs, pectoral muscles, even the neck. This is an excellent prevention of osteochondrosis of the cervical spine, which affects most of the modern generation due to sedentary work;
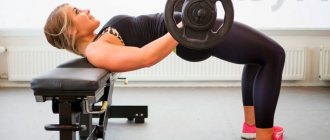
- The development and strengthening of the back muscles allows you to improve the effectiveness and duration of strength training, which is especially important for athletes who regularly perform back exercises with weights (dumbbells, barbells);
- During the deflection of the upper part of the body, the chest “opens”, which has a positive effect not only on posture, but also on the functioning of the cardiovascular system, and also facilitates breathing;
- Regular bending upside down develops the vestibular apparatus, activates blood flow and improves blood supply to the blood vessels of the brain;
- The smallest, but still pleasant moment - the impressiveness of correctly performing a bridge in the gym will definitely attract the admiring glances of all those who do not know how to do it.
We study technique: how to make a bridge correctly
When you have already completely understood the benefits and harms, but still don’t know where to start, you should pay attention to proper preparation. Without this, you can get a serious injury, the consequences of which will then have to be treated for a very long time. You will need to develop maximum coordination of movements, strength of certain muscle groups, as well as flexibility of the spine, which we have already mentioned several times. You need to master the stance very slowly, moving from stage to stage, without making sudden sudden jerks. Moreover, it is enough to include additional exercises in the usual complex of your training program to achieve results quickly and “painlessly”.
Preparatory exercises for developing back muscle flexibility
Warm-up
As before any training, you must first properly warm up your muscles so as not to get injured during exercise. A few stretching exercises, jogging or jumping won't hurt. Walking and jogging in place can also be good options for warming up. For convenience, you can pick up a jump rope, do several bends, circular movements of the body, and light lunges. It won’t hurt to do a warm-up for your hands and make circular movements with your shoulders.
Gluteal bridge
This exercise, with such a characteristic name that characterizes it well, has many different variations. The gluteal bridge is the raising of the pelvis while supporting the feet and shoulder girdle standing flat on the surface. There is a lot of material about it on our website; it wouldn’t hurt to read it in more detail in order to fully understand how, what and when to do.
- From a supine position, bend your knees and place them on the floor. Stretch your arms along your body.
- As you inhale, lift your pelvis and back until they are in a straight line. Support should be maintained only on the shoulders and feet.
- Hold the position for a few seconds.
- Slowly lower yourself to the starting position.
You can diversify the exercise by varying the distance between your feet, performing it alternately on one leg and the other, picking up a barbell or using a fitball. In the classic version, they should be placed at shoulder width, but they can be narrower or wider. This way the force will be transferred to different muscle groups.
The number of repetitions of the gluteal bridge is purely individual. For a beginner, you don’t need more than two or three dozen repetitions in two sets. Then this number can be increased arbitrarily.
boat
This exercise develops flexibility as well as coordination of movements. It may be difficult for beginners to complete, so do not rush too much.
- Roll over onto your stomach, lie straight, put your head on one side and your arms above your head.
- As you inhale, raise your arms and shoulders, at the same time as your upper body. At the same time, you also need to raise your legs. You will have to try not to bend both pairs of limbs, as in the picture.
- As you exhale, return to the original position.
For convenience, your palms can be folded into the shape of a boat nose, and your legs should be pressed tightly against each other. You will also have to pay attention to your hips; they should be as tense as possible, and not “fall apart” to the sides like jelly. You can repeat this 10-16 times for beginners, and over time, double this number.
Reverse plank
Another very effective exercise for developing back muscles, as well as its flexibility, is the reverse plank. There is also an article about this on the site, which would not hurt to read. It strengthens the back, makes it more mobile, and at the same time has a beneficial effect on the whole body, helps to lose weight, and improve posture.
- Sit on a horizontal surface (floor), spreading a gymnastic mat in front of it. Bring your legs together, they should be straight. Place your hands on the floor behind your back so that your hands are in line.
- As you inhale, lift your hips, tensing all your muscles until your body is in one line. Avoid bends or bulges; it should be completely in one straight line. Hold the position for a few seconds.
- As you exhale, return to the starting position.
For beginners, when lowering the pelvis to the floor, you can relax, but advanced athletes do not need to take a break and immediately after returning to the original position, they can repeat the exercise. The quantity is also purely individual, but it’s good to start from two dozen times in two approaches.
How to do a standing bridge for beginners: with support
Before you try to stand on the bridge, you can use additional support. A good option would be a large fitness ball. You can also read how to choose a fitball on our website.
- Sit on the floor with your back to the ball.
- Leaning on your palms and feet, slowly “roll” the middle of your back onto the fitball.
- Raise your hands above your head, place them under the ball, and then place your palms on the floor, pointing your fingers toward you.
- In this case, you need to relax your neck as much as possible and tilt your head back. It can be conveniently placed on the rounded surface of the ball.
- Slowly lift yourself up from the support while bending your body. Make springy movements. At the point of maximum possible straightening of your legs and arms, try to fixate for a few seconds.
Only when this exercise is easy will you be able to move on to performing a real bridge without support. Moreover, there is not one, but several types of such movement; try to master them all, gradually moving from simpler options to more complex ones.
How to perform a bridge while lying down
When the exercise with the ball is no longer difficult, you can move on to exercises without improvised means. The easiest way is to get into a standing position from a lying position on your back, which is where you should start. It is optimal to conduct classes on a fairly soft mat, and not on a thin yoga mat. If you are not working out in the gym, but at home, you can simply throw a not very soft mattress topper on the floor, which is often used to level the “dip” between mattresses on a double bed.
Execution technique
- Lie on your back with your knees bent and your feet flat on the surface. The heels should be as close to the buttocks as possible, or even better, even slightly under them.
- Place your hands behind your head and place your palms so that your fingers touch your shoulders.
- Tighten your abdominals and leg muscles, and then lift your pelvis. While resting on your feet and palms, bend well in your lower back and back.
- Returning to the starting position should be done from the shoulder blades to the buttocks, and not vice versa.
Be very careful as it is very easy to get injured on the bridge. Make all movements smoothly, without jerking. Don’t try to force things, try to do everything consistently and gradually.
How to properly stand on a bridge from a sitting position
Only when you can easily get up into this stance from a lying position can you move on to a more advanced option.
Execution technique
- Sit down on the floor. Bend your legs at the knees, bringing your heels as close to your buttocks as possible. Place your right hand behind your shoulder and position it as when performing a bridge from a lying position, place your left hand along the body.
- Using your right arm and feet, push your pelvis upward, as if doing a glute bridge.
- Describe a semicircle with your left hand, bringing it to the same position as your right.
- Place your hands on the floor and arch your back, making a full bridge.
Returning to the original position will not be easy. The easiest way to do this is to turn to one side. At first, you can simply fall gently onto the mat, but this is a temporary option; this technique is not welcomed by any of the professional trainers.
Technique for performing a bridge from a standing position
If the technique of performing a bridge from a lying and sitting position completely satisfies you, you can move on to the most difficult thing - doing a stand from a standing position. This is not easy, since you will have to find balance with only one point of support, and it is very easy to lose balance. There are two options that we will present to you, the first is simpler and the second is much more complex. It makes sense to first learn how to make a bridge while standing at the wall bars and only then not use any additional means.
Near the Swedish wall
The starting position is simple. Stand with your back to the wall bars, taking one big step away from it.
- Straighten your arms up.
- Tilt them back while arching your back.
- Grasp the bar that is easiest to reach with your fingers.
- Carefully, slowly, move your hands to the step below, then even lower.
- After the lower plank, simply move your palms alternately to the floor and bend your back well, becoming a bridge.
It is optimal to return to the original position in exactly the opposite (reverse order). That is, gradually move your hands up the stairs until you stand up. First, be sure to place soft mats under you during exercise, otherwise it’s easy to get injured, which is absolutely unnecessary for anyone.
Just standing
- Stand straight, feet should be shoulder-width apart, arms raised up.
- Bend your knees while simultaneously starting to bend your lower back.
- Bend deeper, trying to control this process with the abdominal muscles, as well as the muscular corset of the back.
- Reach out and touch your fingers to the surface of the floor. Fix your hands by pressing them tightly to the surface.
- To ensure the correct position, you can take a couple of small steps towards your hands, as if increasing the arch of your back.
How to properly stand up from a bridge
Remember that getting up from the bridge according to all the rules is much more difficult than getting down into it. The stand is quite complex, so it makes sense to experiment. It is unlikely that you will be able to do everything correctly in the reverse order if the strength of the muscles of the back corset and spine, as well as strength and flexibility, are insufficient. Therefore, it is very important to do all the preparatory exercises constantly. They should be included in daily exercises, for example, morning exercises, then you will achieve the desired effect faster.
Option 1
- To lift their stance, shift your weight forward onto your legs, and also move your pelvic area there.
- Push your palms firmly off the floor, carefully maintaining your balance and moving your center of gravity to the usual position for a vertical stand.
- Straighten up.
It is optimal that at first you have someone to help you get up from the bridge. This could be a colleague at the gym, or even someone from the family if you work out at home. Over time, the need for insurance will disappear on its own if you continue to train.
Option 2
There is a more simplified option. This is something in between a wall bars climb and a classic climb without a safety net. At first, you can use this way out of the situation.
- Pressing firmly into the floor, lean your whole body forward.
- Push off slightly from the floor and first raise your left arm. At the same time, rotate the body slightly to the left.
- Immediately push off with your right hand, and then stand up using a twisting movement in the back.
If you train a lot, and most importantly, regularly, then such a stance will be easy for you.
Harm and contraindications
Despite the many positive aspects of performing a bridge, this exercise also has several contraindications:
- headaches, migraines, high blood pressure. Due to increased blood circulation, bridging may lead to aggravation;
- diseases of the spine;
- diseases of the gastrointestinal tract;
- pregnancy.
Bridge complication
If the level of the classic bridge, along the wall and from a standing position, has already been completed and the execution does not give the desired pleasure, but you want more, then you can introduce complicating elements. For example:
- bridge with one leg (at the final point, slowly tear off one leg and straighten it up as much as possible);
| — the narrowest bridge possible (you need to touch the back of your head to your calves); | |
| - bridge on the elbows (from the final curved stance, lower yourself onto your elbows - this requires increased flexibility); | |
| - go into a handstand and back. |
All these methods not only additionally train muscles, flexibility, vestibular apparatus and sense of balance, but also add effectiveness to the training.
How to stand on the bridge correctly and gracefully
The effectiveness of the gymnastic bridge is given by the correct technique and beautiful execution. There are several common mistakes to avoid:
- There is no need to be afraid of losing your balance when walking onto the bridge using your back and shoulders. When performed correctly, only your hands should be involved.
- Quite often, many people do the exercise without transferring the weight of their own body to their arms, that is, through their back, without using their shoulders. As a result, the arms are too arched, and the bridge is unstable and looks unsightly.
The correct bridge is performed with the weight transferred to the hands. The angle between the hands and the floor should be straight. This can be achieved by pre-warming the shoulders. To do this, standing on the bridge, you need to rock back and forth, stretching the shoulder muscles.
How to teach a child to make a bridge
Fundamentally, the approach to developing flexibility and strength in a child to perform a bridge is no different from training in an adult. Children have advantages - they are more flexible and flexible due to the yet unformed muscle corset. In addition, children are less afraid of falling. In any case, the procedure will be similar - warm-up, lead-up exercises, bridge.
It is necessary to pay attention to the mandatory adult control of the process of training children - the exercise is complex and traumatic, especially in more complex versions (with a wall or from a standing position). Adults must certainly monitor the progress of the workout and help in performing the elements.
How safe is it to do a bridge from a standing position?
Fitness professionals don’t even consider a regular bridge from the floor to be a simple exercise. “This exercise is classified as advanced, especially from a standing position,” says Anastasia Yurkova, master trainer of X-Fit group programs in Russia . “In order to perform such an exercise, the body must be well prepared.”
If you gradually prepare the muscles and back, taking into account the condition of the spine, the bridge will not cause harm. However, poor mobility of some segments of the spine is the scourge of a modern person who works sitting or standing. If there are no serious pathologies in the spine (the attending physician will tell you this), then they can be developed.
“When you perform a bridge while lying down, you have good support in the starting position,” explains Anastasia Yurkova, “and the deflection of the spine is performed through the upper and lower segments simultaneously. When performing from a standing position, you will have to bend through only the upper segments. And they just perform this movement worse. In addition, gravity imparts acceleration, making it more difficult to control backward extension.”